Kawasaki Versys Forum banner

Stator Output/ Stator Testing/ Device load Ratings 2015

19K views 88 replies 12 participants last post by  onewizard  
#2 · (Edited)
Use Post 14 and video post 16 for testing, and post 34 in reference to China Stator RM Stator


At some point I will extract all the testing and place it in an appropriate thread. For now, this is going to do it for me.
More of a simple, very quick and extremely accurate test, to prove if any stator damage has occurred.

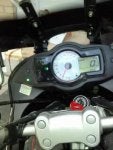
Basically, use your idle adjustment screw and get the RPM around 2000 RPM, this is warmed up RPM, do not try holding the throttle and measuring this.

So depending how fast you are, you may need to hook up your battery tender.

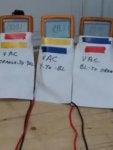
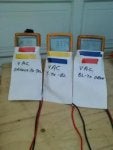
So what you need is some fine jewelers screwdrivers, straight pins or something that can be inserted in your socket of the stator plug, also a meter that reads volts AC, preferably with alligator clips on the probes . This is the 3 wires coming from the stator, to a plug close to your throttle position sensor. This connector has a latch locking it together, to release you need to squeeze down on the latch and wiggle / pull at the same time. When apart you are measuring the output from the stator under no load conditions, for your purpose, make a drawing and identify the 3 female crimps as #1,#2,#3, as long as you know what you are calling when referencing your measurements. So at 2000 RPM measure 1 to 2; 2 to 3; 3 to 1******that is your 3 readings, they should be around 24 to 28 VAC at 2000 RPM, the readings should be 0.5 VAC within each other, that is 1==28.0; 2==27.5; 3 ==28.3----

-if any readings are like the following ****1==24; 2==16; 3==22, you have shorted turns.

There is a third test that can also be done, measure 1,2,3 to ground, record these three readings, should be around 17 volts AC


Note:
One thing I have never mentioned, between my test and Kawasaki. Kawasaki requests 4000 or 5000 RPM, at that speed the rotor is producing maximum flux density, at 2000 RPM it is about 35% of maximum.


Note Added This in February 2017 To Test for Phase Loss on a Series regulator under Actual Load Conditions


Added additional info March 2019


in reference to testing Polaris regulator 4012941 and Polaris 4016868 , both have the same pin configuration except the 4016868 has less losses and a lower forward voltage drop / loss .

For those trying to test to see if the Polaris regulator is OK, a initial crude test would be to use a ohmeter on the 3 phase input, A-B,B-C,C-A all should be in excess of 1 million ohms. You can then hook up the 3 phase input to your stator and follow the 2000 RPM test, only difference is do not connect the battery to the Polaris output. With the bike running you should get no output, also if your battery is at or below 8 VDC I recommend charging the battery first as the Polaris has reverse polarity and low voltage protection built in.

It will not output any VDC no matter even if you are 48 VAC input and 4000 RPM, without having the correct VDC polarity at 8 VDC or greater connected to the output ( this is used to fire the SCR gate pulses) . Lastly connect the proper polarity with a semi or fully charged battery, at 2000 RPM you should get 14.2 VDC with the bike running and base load ( including low beam headlight). At this time you can follow my 3 phase input testing below, be aware not all meters can recognize the 3 phase as it is being rapidly switched, if your VAC readings are within a volt on all 3 phases and you are getting 14.2 VDC out, all is good!!

Original before March 2019;
A better way would be using a small AC clamp on current probe rated for 400 HZ @ 25 Amp AC, pretty sure no one on this forum has one.So I came up with this:
This test is to prove all 3 phases of a Series regulator are functioning, such as Polaris or Compu Fire. What you will need is some straight pins, needles or jewelers screwdrivers, to insert from the stator wire side of the connector. You are measuring VAC, you need to set idle around 1800 to 2000 RPM, have the headlight on, measure A to B, B to C, C to A , record the readings, they should all be around 16 to 18 Volts AC , battery voltage should be 14.2 VDC. If you get one of the phases reading 22 to 24 VAC or more, that phase isn't conducting/ being fired, which means you have a single phase condition on the stator. The stator is rated at something like 24 amp output, phase current is rated at 14 amp maximum, if you have a phase loss, you will get a single phase condition, with a maximum 24 amp available, hence the burnt stator.

If you have any questions ask me. Very little about induction I don't know, that has been my specialty for over 40 years.
The difference is that, at 25% flux density, a small turn to turn short or turn to line short will have a large impact on the AC output. At 100% output, the imbalance between phases will be less noticeable.
 

Attachments

  • Like
Reactions: mikesundrop
#31 ·
Good to know - I'll look into the replacing the shunt regulator, but for now I'm happy to have a working motorcycle again...


Was a bit crazy this week - where I live all my woo-woo friends were talking about the horoscope and mercury, etc.... i went a little MIA there 'cuz I was traveling and just waiting, but here's what happened, whether for other's reference, or curiosity's sake.

I had left the screw in there when I realized i accidentally stripped it and put it all back together since it was nearing dark. I had applied blue loctite. After doing all this research and getting a new drill among other things I was prepared to either repair it myself or take it to a machine shop... wasn't sure which, but after removing it, it was very solid, and after putting an allen key in and lightly engaging the bolt, I could feel that the loctite was solid and hadn't broken, and the bolt was very secure. I decided to risk the weekend ride, and rode some 400mi round trip for work with the stripped bolt.

In truth, it's quite possible I could have ridden many thousands of miles, as when I took the bolt out it didn't really come out too easily, and the threads didn't come out until I started trying to put another bolt it.

Ultimately, after receiving a replacement stator cover (which I'm not returning), I got a look at the bolt hole and realized it's actually quite deep! a full 16mm at least. For some reason they use an 8mm bolt, but there's much more space. When I realized that I decided it was silly to replace it and sillier to tap it, and I just went and got a 16mm long M6 bolt, put it in with loctite red and I've got it all back together now.

Nice that I can also return the time-sert kit I bought (not cheap), but I'm keeping the drill :) In hind-sight, I'm not sure why I was trying to go with an M7, M7 bolts and taps are damned near impossible to find, switching to standard would have been perfectly reasonable, and I had found a local machine shop that'd do it. Next time, I've got their number on hand.

I was able to re-use the aftermarket green gasket once, but it broke after removing the stator cover post 400mi ride. This time I re-used the original gasket just for kicks and haven't noticed a leak (i have another gasket on hand and will replace it if it leaks).
 
#32 ·
Excellent Post on Stator gasket / bolt size

Good to know - I'll look into the replacing the shunt regulator, but for now I'm happy to have a working motorcycle again...


In truth, it's quite possible I could have ridden many thousands of miles, as when I took the bolt out it didn't really come out too easily, and the threads didn't come out until I started trying to put another bolt it.

Ultimately, , I got a look at the bolt hole and realized it's quite deep! a full 16mm at least. For some reason they use an 8mm bolt, but there's much more space. When I realized that I decided it was silly to replace it and sillier to tap it, and I just went and got a 16mm long M6 bolt, put it in with loctite red and I've got it all back together now.

Nice that I can also return the time-sert kit I bought (not cheap), but I'm keeping the drill :) In hind-sight, I'm not sure why I was trying to go with an M7, M7 bolts and taps are damned near impossible to find, switching to standard would have been perfectly reasonable, and I had found a local machine shop that'd do it. Next time, I've got their number on hand.

I was able to re-use the aftermarket green gasket once, but it broke after removing the stator cover post 400mi ride. This time I re-used the original gasket just for kicks and haven't noticed a leak (i have another gasket on hand and will replace it if it leaks).

Nice to see some info that would allow the next person some flexibility when running into a similar situation.FYI, never use red loctite on bolts this small unless you use heat first , and you have about 5 to 10 seconds to try moving it after removing heat. Far better to use blue loctite , and there is a warning that blue becomes permanent when using on bolts smaller than 10/32 , same thing, using heat if it feels like you are going to break the bolt, better using heat than trying to drill out a steel bolt in a aluminum housing.

:thumb::thumb:
 
#33 ·
Ultimately, after receiving a replacement stator cover (which I'm not returning), I got a look at the bolt hole and realized it's actually quite deep! a full 16mm at least. For some reason they use an 8mm bolt, but there's much more space. When I realized that I decided it was silly to replace it and sillier to tap it, and I just went and got a 16mm long M6 bolt, put it in with loctite red and I've got it all back together now.
.
Note: If you ever need to remove that 16mm long M6 bolt, please make sure to use heat (torch). Otherwise the bolt has a GREAT CHANCE of breaking. Hopefully this will never be an issue for you (since you intend on installing a series regulator in the near future).

Good feedback! :thumb:
 
#34 ·
Testing Stator to see if Toast

Time to address the R/R and stator on my 08 650
I've been putting off the Polaris RR purchase but now the situation has become urgent. Lately I noticed at first start in the morning, the gas gage reads lower then it should. Then last weekend I was out on a long ride when power would start to fad all of the sudden for brief periods. At 30K miles, I figured it's time to change the stator. I have been doing research and trying to get everything needed. Is the ricks motorsports worth the extra cost or is there a better option. Years ago I change the stator on a old CX500. I got a rewind from Custom Rewinds. I tried calling there today but got no answer. Is a new gasket a must for this job?
Your first question about gasket, I bought one, not needed, unless you get over eager to take thing apart, remember the rotor is a powerful magnet, it takes a certain amount of force, don't get your fingers in between!I have helped several people, never had to change the gasket! You might be the lucky one that damages theirs, so over the years on this forum, over 15 stator changes, 0 gaskets.


I am not one for being a parts changer to see if new parts fix the problem. I prefer proving the parts need changing, several people have found a corroded stator plug, if attended to right away, this can delay or eliminate damage.

If you follow some of my info in the Polaris thread, you will notice talk of Delta wound OEM and Y or star wound after market. The issue I have with Y connected is the wire gauge is 18 gauge per line out, Delta wound is two 18 gauge per line out, yes they are oil cooled, yes a Y stator if connected to a Polaris regulator will only see about 60% of max load, so it would be fine. However, a Y connected stator to a OEM shunt regulator would be carrying 13.85 amp per 18 gauge line out. I have discussed this in detail under that thread.
Custom rewind, got no answer 3 years ago, when I started looking into this. Rick's , well I have also commented what I think of their work.

As to stators, many haven't bothered to look at wreckers as a source, KLR 650, Ninja 650, going rate for a good stator is $120 USD, also on this site:http://www.kawasakiversys.com/forums/23-sale/116209-rm-stator-sale.html

http://www.kawasakiversys.com/forums/1072521-post5.html
 
#35 · (Edited)
Stator Failure / Polaris Regulator

RM Stator China Stator reference

Since this was in the for sale thread for Smiley RM Stator , I thought it appropriate to update some info that I posted here yesterday, and move it to my Polaris thread. However, some members may be considering buying this stator and aren't sure if this is a good deal, hence the explanation;


A little update, for someone on a tight budget that has a stator that has failed, is willing to learn, and would like to upgrade your regulator to a series from a shunt, this would be the way to go. Y connected RM stator and a Polaris regulator = equal a OEM Delta stator with a Shunt regulator.

However you need to convert to a Polaris at the same time as the install of the RM stator. This combination will equal or exceed the lifespan of OEM stator / regulator, gets complicated ,-------------***** for more on this,= go to :https://www.kawasakiversys.com/forums/1061042-post2.html

:thanx::type::blah:
 
#36 ·
Stator Output / Base Load/ Series verses Shunt Regulator

New to the forum ....maybe this question has been answered before but here goes. Does a 2012 650 have enough electrical output to power heated grips, Gerbing electric jacket with gloves & heated socks at the same time ? I can’t seem to find what the alternator puts out.
More than enough power, however you could make a huge improvement by switching to a series regulator.
http://www.kawasakiversys.com/forum...4-how-forum/105962-stater-output-stator-testing-device-load-ratings-2015-a.html

Shunt Regulator
So a shunt regulator rectifies the 3 phase AC and converts it to DC, very simply done using 6 diodes, 3 positive 3 negative, from the active part of a shunt regulator, it doesn't do anything and what I mean by that, the MK-1 and MK-2 regulators had a brown key switch wire, it sole purpose was to control the shunting part of the regulator, when some had key switch problems, the symptoms were blown headlight bulbs, varying brightness of the headlight at higher RPMs etc. What happens is the brown wire provided a reference / power source and at roughly 14.5 to 15.1 VDC it would short to ground the excess VDC, typically I have seen 14.9 VDC before shunting occurred. So I am going to say around 4000 RPM the stator is able to produce full power of 336 Watts, this is actually what it is doing, that is the stator is running at 100% load all the time during which it can produce 100%.

Series Regulator

The series regulator is electronically active immediately upon starting the motor, it starts to switch off as we go above 14.2 VDC, the higher the RPM and the lower the demand for power, the faster it switches off, in other words it's off cycle becomes longer than the on cycle, it is far more precise as to VDC, my Compu Fire regulator is Rock solid at 14.200 VDC even at 10,000 RPM. I won't go any further here in explaining, as I have extensive details in my posts in the How To Forum under Series verses shunt etc.


First thing is in that link I describe base load, add to that any accessories you have such as Gerbing jacket etc. , that is your total load or total watts, that is what your stator sees all the time it is able to produce it. I have changed a few things from my first post, I added Denali D2 LED lights and I removed about 40 watts by converting my low beam headlight to LED, ( I don't like the one I have and will eventually chuck it, for now it doesn't matter as the Denali have improved what I need)
So if I had my Gerbing jacket set at 10, and my Oxford Heated Grips at 100%= about 130 Watts total ( my base load including the Denali on high beam is now approx. 142 Watts) , so with the heated gear at maximum , total load = 272 watts on my bike. FYI it would need to be about minus 5 'F to be running at maximum for any length of time, if you were properly dressed, the only thing I could see running at max would be the Oxford Grips, FYI you should have Bark Busters or some other wind protection for the grips. I have the Givi Muffs, but it is a challenge to get comfortable having your hands hidden from view and the feeling of claustrophobia.

Summary So to sum it up, base load using all original bulbs /headlight bulbs etc. is about 172 Watts, so out of a 336 available stator output you are left with 162 watts , keep in mind when you are idling, you will be going below the 14.2 VDC of a series or the 14.5 of a shunt, possibly as low as 13.0 VDC at idle

Many advantages to going to a series regulator, and I have 3 methods of conversion posted in the How To forum. I hope this helps
 
#37 ·
The battery came to mind but because of previous information from you I knew it had been changed. Good thing you have someone with a proper battery load tester .I intend to stick this thread until I figure out where I want to put it. It has become obvious that my Polaris threads are too numerous, and I need to stream line them. Also inline photos. Right now that is time I don't have to spare.
Since the new battery is due in a few days anyhow, I'll do the diode mod. Also since the bike is still opened up I'll take photos and possibly a video to sum it all up and put it up in a post. I'll post in this thread itself so that it can be later added somewhere else ?

i should have suspected the battery but the resting voltage of 12.8V was some false indicator. The load tester at the shop also gave a pass on the first try but then they had another more advanced tester with some variable cyclic tests which it failed immediately. After this it again failed on the first tester which was basic (basically it emulates cranking of starter motor as per their info)

As I read your post my thoughts were that it sounds like a battery, and I was going to recommend you have it "load-tested" as Sylviefox suggested.
Glad you found the problem...!
:goodidea:
So am I ! Electrical issues are almost like witchcraft but the more you know the better you diagnose ! I did not suspect the battery at first since its barely an year and some months old and comes with a warranty of 2+2 years. Battery to be replaced FOC!

A bad ground can be the source of all kinds of gremlins.
It's always a good place to look first and perhaps save you hours of diagnostic hair pulling. If you are like me there is not much hair to pull these days.
Glad you got her fixed.
Yes even though the culprit turned out to be the battery, I certainly did not like the rust around the main grounding to the chassis. Was a good measure to open and clean up to avoid any future problems!

EDIT
So after googling around for a bit found this which pretty much explains the scenario better:

I guess the battery on mine deteriorated and had a loose connection inside which would cut the current abruptly. Sometimes it would work and cut off at random. But it completely died when it went though proper load tests at the battery shop. Nail in the coffin.

A healthy 12 volt motorcycle battery should maintain a range from 9.5 - 10.5 volts under the load for a good 30 seconds straight. If the battery begins to hold and then steadily drops in voltage, there is a problem. If the voltage instantly drops to 0 volts, that is also a problem. We call this the open cell. On a new battery, this can be a result of manufacturing flaws, but it also may be caused by sulfate crystal buildup.

Under the intense heat of the load, one or more of the weld pieces connecting the cells is coming loose and separating. This will cut the current, and voltage will drop. When the battery cools off, the pieces will touch, barely giving a complete connection. This gives you a false voltage reading. Batteries with open cells may read fully charged in idle, but they fail under a load test every time. Once a battery reaches this point, there is no going back. The best thing to do is recycle the thing.
 
#38 ·
Rectifier Upgrade to fix Stator Coil Issue :

All credit goes to onewizard and others who have successfully retrofitted the Polaris SH775 Series Regulator. There are plenty of texts and posts to read about the matter which can be daunting at first. Piece it all together and the upgrade is clearly beneficial. This post is however working with a Ninja 650 (2012-2016) and the location of the regulator is different. The sockets and wiring are the same however.

A little info
Stator coil seems to be the Achilles Heel in the 650 platform. The OEM Regulator is a shunt type regulator which only works in a rather inefficient way. To put it in simple words the shunt regulator keeps the stator loaded at near maximum at all times during operation. The excess current not needed by the motorcycle after subtracting electrical loads is grounded. This eventually leads to the stator shorting or burning a few poles due to aging of the insulation material due to the heat generated. Its like a dam reservoir is open 100% but only a bucketful of water is taken from the outflow and the rest is wasted downstream.

In retrospect the series regulator varies the output current by referencing the voltage across the load. The series regulator will not draw current if there is no load. If load increases it will react to the change to let in more current until the desired voltage is maintained. Therefore the series regulator is much more efficient and the benefit of this is that it does not unnecessarily load the stator coil to provide current. This results in a much more prolonged life of the stator

This is what the burned out stator will look like, a few poles blackened out.


Brand new coil from a 2016 N650, note that the coil is slightly different and there is no epoxy coat over the poles to dissipate heat better.


Before you begin

- Disconnect and remove the battery from the motorcycle and put it on a battery tender to keep it charged up.

- Tools and misc stuff needed for a neat job :

Air blower (to blow the dust away before you start taking apart the gas tank, airbox)
Sellotape (to cover the exposed throttle body, pcv tube, secondary air valve intake at top of the cylinder head cap, fuel line from dust)

Wire Strippers,
Soldering iron (solder wire, flux paste, de soldering wire etc )
Insulation tape
Heat Shrink tubing
Electrical Insulation spray

Multimeter / Voltmeter (ac/dc)

Components needed to be bought

Polaris SH775BA Series Regulator
IMPORTANT NOTE : Buying used will greatly save cost like I did buying from ebay.com, but make sure that in the product image you can see the SH775BA stamped on the rectifier itself. There are plenty of cheap chinese unbranded regualtors that look the same but will not have this part no stamped on them. Stay away from these as their construction and reliability is completely unknown. Brand new polaris rectifier is around $160 [ part no : REGULATOR-3PH,35A,SERIES,105C (4012941)]


New Stator Coil for the 650 OEM recommended.
The OEM stator is a delta wound stator with much more copper against the aftermarket replacements which use a Y winding pattern to save on copper costs.


Triumph Link Lead
This can be ordered from T2500676 Triumph Link Lead, Regulator $10.00 - 2WheelPros , they also ship internationally partnered with a shipping service.


Stator Cover Gasket
Since Kawasaki India pretty much sucks hardcore, they did not have a single gasket in the entire country in stock. So I made my own with laser cutting done on gasket material. The stock gasket is a graphite coated reusable gasket so if you pry off the gasket carefully you will not need a new one. Mine was damaged in removal so needed a new one. This gasket material is normal and not reusable.


I am not covering the stator installation and testing as its completely shown in the workshop manual, along with the ac voltage check across the three pin socket coming from the stator itself.


POLARIS RECTIFIER UPGRADE

On the ninja 650 the rectifier is located in the middle of the chassis directly below the steering lock.
To get to this you will need to remove the gas tank, the airbox, the secondary air valve.

Before you remove the airbox use the blower to blow away any loose dust as the throttle body will be exposed to unwanted matter.
After the airbox is removed, use sellotape to cover the throttle body ports, as well as the tubes connected to the engine and also the secondary air valve intake port on the cylinder head. Also cover the fuel line. I also removed the ECU to avoid dangling it on the side, also covered the ecu socket with sellotape.


After the secondary air valve is removed, it is possible to take out the rectifier. You have two 10mm bolts to loosen to remove the rectifier. There is a clip on each bolt to keep the wiring above the rectifier tidy and in place. Do not forget to install these back during reassembly.


Now remove the stock regulator from the socket, and then cut the female socket on the wiring harness to an approximate length below. This length will allow you to go stock if you want to sell the motorcycle.


Then take the triumph link lead and cut these two connectors off. The postive and negative dc lead each split into two wires which we dont need.


CONNECTING THE NEW SOCKETS
Before joining the wire slide the heat shrink tubes over each wire and push them away as far as possible from the point of wire join as solder heat can cause the heat shrink to.. shrink.

To join the wires I joined them interwoven and soldered them (inline wire splice), then wrapped in electrical tape and then the heat shrink was moved over (shrunk later after testing), the wires from each side had about an inch and half of exposed wire so that the solder and connection is strong enough. While joining the wires please keep some sort of metal sheet below the work area to avoid dropping solder on the motorcycle components. Also make sure to wear safety eyewear and not breath in the solder fumes.

Now take the triumph lead socket with three pins and connect the three black wires to the exposed black three wires from the wiring harness, order is not important.


Then take the other two pin socket of the triumph lead and join the brown wire from the lead to the white wire from the regulator. Both the white wires from the wiring harness end up as one so its okay to join them as one. The black ground of the socket goes to the yellow black wire from the bike.


This is what the new socket setup looks like. I then wrapped all the five wires with an eletrical insulation tape to keep the wires tidy.


Spray the female sockets with an hydrophobic insulation spray like this. Then couple them to the newly installed rectifier.


Now connect the polaris rectifier and install it back. This regulator causes a bit of a problem to slide back due to size of the sockets getting obstructed in the little space in the chassis. Move the rectifier in gently and dont damage the connectors while doing so. Here's what I mean.


After putting back everything together, reinstalling the battery, voila, Success ! 14V on my onboard voltmeter !
 
#39 ·
Headlight Not Working

OK I have gone through this with another member. Be certain the 10 amp fuse is good. The next test is fairly simple, you need to open the connector from the stator , in the second detailed thread I show testing the stator with voltmeters, you need to use the connector end going into the wiring harness. What you do is have a small wire connected to the positive terminal of your battery, have the plug apart going from the stator, turn the key switch to run, do not start the motor, touch all three spade terminals, 1 at a time, you should hear a clicking noise on 1 of them, pay close attention, if in doubt key off then on again, try touching one at a time, pay attention to which terminal produced the clicking, it will happen only once per key on. Check if the headlight came on and post this.If you hear a clicking on one terminal and repeated touching of that terminal produces a clicking noise, even though you haven't keyed off, you have a blown 10 amp headlight fuse
If nothing happened you will need to remove the gas tank, and need a meter that reads volts DC to 14 VDC, the center plug of the relay box has a grey wire pin #3, with the key on, you should have 12 VDC, again you should have been able to determine this without taking the gas tank off. If you have reached this point of testing chances are your headlight relay is toast, the bottom post is how to install a after market relay/ socket, for less than $10 that is easily changed out at anytime in the future.

https://www.kawasakiversys.com/foru...s/170-technical-discussion-v-650/212897-2007-versys-650-headlights-problem.html
This thread has more detail
https://www.kawasakiversys.com/foru...lay-box-headlight-relay-failure-2007-cluster-testing-cheap-fix-china-relay.html


:feedback:
 
#40 ·
Replacing Headlight relay

Actually pulled them and tested the connection points with a multimeter on DC voltage. Also tried using the spare fuses and switching fuses from working components to no effect.


Hm, I'm exceptionally limited on my knowledge and capabilities of electrical work, but I may see what I can do with this. I found a used wiring harness for pretty cheap and I was just planning to replace the entire thing.

But if I can just replace the relay box for $13, then I'll return the $75 harness.
Well you didn't mention what happened/ or if you tested the relay using the plug from the stator and applying 12 VDC as I described previuosly, this test is primarily in case your stator is going, I would assume by now that if that was the case your bike wouldn't be running anymore. So the link I provided is the procedure. Here is a example , complete with socket, notice it say SPDT and has 5 wires, yes that is the price complete . Search 12 volt 40 amp
https://www.ebay.com/itm/New-12Volt...s-Socket-NEW/382480854272?epid=780469474&hash=item590da2ad00:g:t6kAAOSwa~BYN-lm Be aware these can be purchased from Princess Auto in Canada . You can find them in the US on ebay for about $22 for 5, be aware that many sellers ship from China, expect to take up to 5 weeks for that $3 relay.
 
#41 ·
Electrical 101/ Anybody

Unfortunately I didn't get the email that there'd been a response here before ordering. :(

So far all that's happened is that the headlights and high-beam dash indicator have gone out, all at the same time. It's been about a week now, and there has been 0 change in any other part of the bike. DRL's, blinkers, brake lights, the rest of the dash - all works.

I really have less than a 5 year old's understanding of electronics, and I'm a bit ashamed to say that the link lost me real quick. I'm comfortable tearing an engine down to the ground and putting it back together, but if I have to start messing with wires, I'm at a complete loss. I'll see if I can't figure out and follow the guides you gave, otherwise I'll probably try plugging in a new relay, and if that doesn't work I'll just work front to bag plugging in the new harness. I can do plugs, plugs are simple enough. :p
If you are more comfortable I can work through PM, that link where Verspkd posted, and not trying to embarrass anyone ( 100 total PM, sometimes if spread over time, I have extreme patience , but not always), that was a challenge for me due to the fact that the previous owner modified the wiring harness which was part of the problem, once this came to light, and it was the present owner following my instructions and discovering wires cut off and taped up at the headlight end of the harness.

Once that was corrected it was much easier, although I made a mistake assuming the electrical drawing and wiring harness were identical for the headlight relay ( headlight relay socket has 6 wires , drawing showing headlight relay shows six wires, the wiring harness uses only 3 of the electrical drawing headlight relay socket wires.) I now have a way of replacing just the headlight relay with a after market relay as posted earlier. You might be better off just replacing the relay box, however this is a common problem with the headlight relay failing, so a very expensive situation replacing the complete relay box.

Some have purchased used and it worked, however you need to question why someone is selling a good used relay box?? As to the harness, I would never replace that unless the bike was involved in a crash or mice went at the harness or some other destruction occurred. If you are interested I could try and modify the How To thread and add detail where needed to help you, first I need to know what you don't understand, also you need to be able to solder, you could get away with posi-taps although I am reluctant to use them in this application.

:feedback:
 
#42 · (Edited)
100% Load/ Continuous

While we're on the subject I have a question (maybe a dumb one) about the issue as well. Is the stator issue a direct result of adding on additional electrical accessories, or were some having the issue on completely stock V's and is just a poorly designed part? Obviously i understand that anything can fail for any reason at any time on anything mechanical, but thought maybe the increased load might be increasing the odds.
Adding additional loads with the stock stator regulator has absolutely zero effect. Understanding why it fails is explained in one of my Polaris / Series regulator threads. The reason is two fold, one the stator is under 100% demand all the time ( I use the word demand as the stator isn't able to output 100% all the time i.e. below 4000 RPM) . the second is due to the 100% demand { shunt regulator wastes or shunts excess energy to ground in the form of heat} , when we go from idle to above 4000 RPM we have a energy increase which causes a heat increase and this causes expansion of the copper winding, when we go from above 4000 RPM to idle we get the reverse action. This expansion and contraction eventually causes the varnish coating on the magnet wire to fail, which = burnt stator. Your car alternator / regulator and the series regulator only produces actual base load plus actual demand 100% of the time, which is roughly in the case of the Versys 650 about 70% of maximum stator output. Since the output is stable at all times, except when the fan comes on, these heat cool cycles are almost non existent.
Some of the early stators failed due to crossover connections, this was alleviated roughly around 2012, also discussed in burnt stators.
 
#43 · (Edited)
i just changed out my stator and regulator with r and m parts. i bought them years ago and finally put them in because i have about 52k on the bike. but everything was working fine. the new stator and regulator worked fine for about 400 miles then my volt meter dropped down to 11.5 volts and i headed for home. putting the old reg back changes nothing. is my problem likely the new stator?
First Place I would look is the connector from the stator, several have had a failure here . What bothers me is you state RMStator for parts, their regulator is shunt, not series, their stator is Y not Delta, , Delta has 2 18 gauge wires per phase/ line out, Y has one 18 gauge wire per line out. Quick test is https://www.kawasakiversys.com/foru...-output-stator-testing-device-load-ratings-2015-a.html?highlight=testing+stator Excellent chance your stator has failed, caused by the wrong regulator. I did a post about this
Or could be a bad connection. I lost charging on my recent trip. Got out the volt meter and traced it to a bad connection at the regulator(Polaris). Having a volt indicator on the dash saved a whole bunch of hassle.
Thanks for posting, and yes , having something like this
Image


Image


https://www.amazon.com/dp/B01CNO8LAG?tag=vs-powersports-convert-amazon-20

I included one of my posts explaining the RM Stator issue first hand, as I helped install one of RM Stators and came up with the Polaris regulator solution
https://www.kawasakiversys.com/forums/1348378-post8.html
 
#44 ·
I recieved this in a PM today ;

Hi onewizard, I’ve put approx 500 miles on the bike since the issue I had and then the lights died and then the bike died. Just done the stator and alternator tests again and showing 55v at 4,000 rpm (manual suggests 42v) Defective R/R again???

Thanks
Vaiders


I removed some of the PM, as the question was about installing a CompuFire or Polaris regulator and what was involved. Since the bike is a 2011, I would recommend getting a Polaris 4012941 regulator and Triumph harness.
Very first thing is to test the stator using my test procedure , you couple a Polaris with a bad stator, expect regulator failure.In this particular case something happened to cause the ECU to fail and the headlights to blow, you don't want to repeat that. In your case I would suggest doing the 2000 RPM, if voltage is balanced between phases, adjust the idle screw to 3000 RPM get all the measurements and record them, make sure you measure each phase to ground, if the stator is good you will get the same volts ac , however it could be considerably off from the 2000 RPM, this volts to ground is a reference only, I am sure very few people know why on this forum, however your measurement with your meter could be different than if you used a different meter, because of 2 reasons, OEM is Delta Connected, so a reference to ground is common to all lines out, Y connected would be similar, however the volts to ground if the stator is good is what is called capacitive coupling https://en.wikipedia.org/wiki/Capacitive_coupling , if the stator is good, all 3 phases should be very close, within 2 VAC, if in doubt post your readings.
Hi,

Sorry for the delay, I’ve just finished nights.
Tested the stator and got the following results:

3phases all balanced at 0.18 ohms and all IR >1000Ms

Engine warmed up and then tested at:

1350 RPM - ~25v (ph to ph), ~13.5v (ph to Grnd). All phases balanced.

2000 RPM - ~34v (ph to ph), ~18.5v (ph to Grnd). All phases balanced.

3000 RPM - ~48.5v (ph to ph), ~27.5v (ph to Grnd). All phases balanced.

4000 RPM - ~68v (ph to ph), ~38v (ph to Grnd). All phases balanced.

Oddly, when the stator lead was disconnected the headlight came back on....

Just tested the rectifier as per the manual and no light coming on during final test....

New R/R then!?!

Has anyone used bikebandit.com? They have a new Polaris 4012941 and triumph lead for $200, delivered to the UK for $300. Sound reasonable?

Cheers

Vaiders
 
#48 · (Edited)
Stator Testing / Series Regulator Verification Test


Note Added This in February 2017 To Test for Phase Loss on a Series regulator under Actual Load Conditions


Added additional info March 2019

in reference to testing Polaris regulator 4012941 and Polaris 4016868 , both have the same pin configuration except the 4016868 has less losses and a lower forward voltage drop / loss .

For those trying to test to see if the Polaris regulator is OK, a initial crude test would be to use a ohmmeter on the 3 phase input, A-B,B-C,C-A all should be in excess of 1 million ohms. You can then hook up the 3 phase input to your stator and follow the 2000 RPM test, only difference is do not connect the battery to the Polaris output. With the bike running you should get no output, also if your battery is at or below 8 VDC I recommend charging the battery first as the Polaris has reverse polarity and low voltage protection built in.

It will not output any VDC no matter even if you are 48 VAC input and 4000 RPM, without having the correct VDC polarity at 8 VDC or greater connected to the output ( this is used to fire the SCR gate pulses) . Lastly connect the proper polarity with a semi or fully charged battery, at 2000 RPM you should get 14.2 VDC with the bike running and base load ( including low beam headlight). At this time you can follow my 3 phase input testing below, be aware not all meters can recognize the 3 phase as it is being rapidly switched, if your VAC readings are within a volt on all 3 phases and you are getting 14.2 VDC out, all is good!!

Original before March 2019;
A better way would be using a small AC clamp on current probe rated for 400 HZ @ 25 Amp AC, pretty sure no one on this forum has one.So I came up with this:
This test is to prove all 3 phases of a Series regulator are functioning, such as Polaris or Compu Fire. What you will need is some straight pins, needles or jewelers screwdrivers, to insert from the stator wire side of the connector. You are measuring VAC, you need to set idle around 1800 to 2000 RPM, have the headlight on, measure A to B, B to C, C to A , record the readings, they should all be around 16 to 18 Volts AC , battery voltage should be 14.2 VDC. If you get one of the phases reading 22 to 24 VAC or more, that phase isn't conducting/ being fired, which means you have a single phase condition on the stator. The stator is rated at something like 24 amp output, phase current is rated at 14 amp maximum, if you have a phase loss, you will get a single phase condition, with a maximum 24 amp available, hence the burnt stator.

If you have any questions ask me. Very little about induction I don't know, that has been my specialty for over 40 years.
The difference is that, at 25% flux density, a small turn to turn short or turn to line short will have a large impact on the AC output. At 100% output, the imbalance between phases will be less noticeable.


Testing to see if a Series Regulator Under Load
July 2019

I copied some text from my original testing post. Since there are some others making Series regulators, in the UK, I have been asked to come up with some method of testing.


Note two different meters showing VAC, actually connected to the same phases, to show that with a chopped up waveform each meter displays differently using VRMS ( volts root mean square ) the important thing is when measuring at a fixed RPM, using the idle screw adjustment only
all phases should measure within 2 VAC at this fixed RPM, also there should be a linear increase with linear RPM increase if everything is working correctly, keep in mind we are talking a series regulator here
Image


Notice this is chopped up and a very common waveform when viewing inverter waveform's, in this case some of the waveform is harmonics, generated by the switching off. I posted the scope waveform's as another member was unable to get the values of VAC on his digital meter, what is important is two things should be apparent when using a digital meter while the regulator is outputting DC volts and current. The first is the voltage measured on A-B ; B-C; C-A should all be within 2 VAC at a fixed RPM, the second is you should see a increase of volts AC by at least 15 VAC at or above 3500 RPM , if you fix the RPM using the idle screw, say at 3000 RPM ( be aware you don't have a lot of time, as the fan will start cycling), the VAC should be balanced as in the same manor as at idle. I quoted Vaiders as his VAC measurements are extremely accurate and similar to what you should see on your bike.
Image


Note the 46 VAC and the meter showing DC Amp, this amp measurement was using a hall effect amprobe which outputs 1 milliamp per amp DC, so the scale is milliamps DC, this was measured around 3500 RPM

Image

This was at idle with the headlight off, note the 6 amp DC , this is fuel pump stick coils, ECU, tail light and city light etc.
Image

Yes it is a jungle, I know what is what>:)
Image


This is idle RPM with low beam on note 11 amp DC, 15.8 VAC , one note, I forgot to mention, both the last photo I have my Denali LED lights on, the previous was low beam, this 11 amp one is high beam, be aware that with LED lighting, a voltage increase actually drops the DC current, also note the VAC between meters isn't the same, mainly because of how they interpret the waveform, which is why I have several different meters.

Image


This is full output around 4000 RPM, be aware this is a bit abnormal and lower than it would be if moving at or above 60 KM/HR , all these tests were with the bike at 190'F or higher , with the fan cycling , reaching 205'F , there was only convection cooling on the regulator , so both the stator and regulator was operating under abnormally high temperatures, you wouldn't be stopped in traffic with heated gear on 100% and grips on 100% at or above 75'F or 21'C which is what these tests were done under. So I had 23.5 amp DC at 13.53 VDC, the current could be higher as I was using my 1000 amp DC hall effect probe, I have another one rated at 500 amp DC which would have been better.

Image
 
#45 ·
Hi,

Sorry for the delay, I’ve just finished nights.
Tested the stator and got the following results:


Has anyone used bikebandit.com? They have a new Polaris 4012941 and triumph lead for $200, delivered to the UK for $300. Sound reasonable?

Cheers

Vaiders
The price is good as to a 4012941, However the 4016868 is half that almost and has a higher current rating , unfortunately it is much more difficult to install. If interested I can find a legit used one off Ebay, so far I have purchased around 5 used ones all were 100% OK. I will send a PM to you.
 
#46 ·
Copy To How To

Hi,

Sorry for the delay, I’ve just finished nights.
Tested the stator and got the following results:

3phases all balanced at 0.18 ohms and all IR >1000Ms

Engine warmed up and then tested at:

1350 RPM - ~25v (ph to ph), ~13.5v (ph to Grnd). All phases balanced.

2000 RPM - ~34v (ph to ph), ~18.5v (ph to Grnd). All phases balanced.

3000 RPM - ~48.5v (ph to ph), ~27.5v (ph to Grnd). All phases balanced.

4000 RPM - ~68v (ph to ph), ~38v (ph to Grnd). All phases balanced.

Oddly, when the stator lead was disconnected the headlight came back on....

Just tested the rectifier as per the manual and no light coming on during final test....

New R/R then!?!

Has anyone used bikebandit.com? They have a new Polaris 4012941 and triumph lead for $200, delivered to the UK for $300. Sound reasonable?

Cheers

Vaiders
FYI you have just provided some base values at various RPM , open circuit , I should add the reference to ground is just that, all the phase voltages are common with other bikes I have tested , the 2000 RPM is within 1 volt, what my 2000 RPM may be over or under your 2000 RPM. Excellent post.
 
#47 ·
Hi,

Sorry for the delay, I’ve just finished nights.
Tested the stator and got the following results:


Oddly, when the stator lead was disconnected the headlight came back on....

Just tested the rectifier as per the manual and no light coming on during final test....

New R/R then!?!


Cheers

Vaiders

OK I am not clear if you used the service manual regulator test , or if you plugged everything back in and ran the bike?? So a quick test to prove the headlight relay works properly , with 3 phase plug disconnected , take a wire from the positive post of the battery or you can use the horn wire ( one side goes to the horn button which is ground and the other is positive when keyed on) Take the positive wire, key on but bike not running , the socket end that goes to the regulator , touch one pin at a time, one of those goes to a diode inside the relay box and should bring on the headlight, once on, a quick bump of the starter switch ( 1 second or less) wil kick the headlight off again, you can then try a second time on that pin of the 3 phase socket. The second instance of the headlight coming on while disconnecting the regulator is a flaw in the wiring, on a well charged battery caused by a induced voltage from the release of the start solenoid. ( I describe this about triggering for the Polaris adding a diode at the main fuse /start solenoid ).
 
#49 · (Edited)
ElectroSport Delta Wound / Info

This was sent to me as a Email message. My comment is the OEM states it as 330 Watts. At one time I considered rewinding a core I have, one consideration was to drop some turns per phase, which would produce a lower impedance and also a lower output voltage, in turn this would produce a higher current. It is hard to say if ElectroSport did this, also I looked at increasing the wire gauge to a single 14 gauge wire Star wound, or a 17 gauge Delta wound ,this would be extremely difficult to hand wind, and there is insufficient room for 17 gauge unless you drop turns Delta wound. Presently the OEM is one 18 gauge wire per phase.
I also have a link and last time I checked it was around $140 USD
https://www.electrosport.com/collec...torcycles-kawasaki-2015-versys-650/products/esg638-stator-kawasaki-zx-6r-zx-6rr

This is from a PM sent to me;
from: Info - ElectroSport <info@electrosport.com>
date: Aug 5, 2019, 9:24 AM
subject: Re: Versys 650 stator tech question

ESG638 is delta wound. The power output is 330w by out measurement, the OEM was 300w, so ESG638 is about 10% more powerful.

The reg/rect we sell for this bike, ESR444, is a shunt unit like OEM.

Kyle Wood - Sales Manager

-------------------------------------
Procom Engineering / ElectroSport
21 Brookline, Aliso Viejo, CA 92656
PH: (949) 305-4200
www.electrosport.com
 
#50 ·
  • Like
Reactions: Fastoman
#51 ·
A little trivia here partially related to post #15 . Some of the tests I have developed are from my inverter experience and understanding of the principle of induction. In a certain case and due to copyright I can't be specific but a choke rated at 12 millihenry's had a resistance of 114 ohms using a ohm meter. This choke or series of chokes operated a very special piece of safety equipment, if malfunctioned someone definitely could be killed and in fact there were fatalities. So my very first experiment was involved with a system that wouldn't run and was costing $100,000 a day in lost production. I strongly suspected these chokes, my first experiment was using a 60watt incandescent trouble light in series with these chokes using 120 volts AC at 60 HZ, in series with my Fluke 189 on current AC, the light was overcurrent protection for my meter, yes the foundry maintenance foreman was shaking his head, well I am use to that, guess what , two chokes measure 9 milliamp and with the ohm meter 113 ohms , two more measured 90 milliamps and 114 ohms. Yes the 90 milliamp chokes had shorted turns. BTW those chokes are like I said 12 millihenry So in this example two in series should have been 24 millihenries but instead were around 2.4 millihenries or 1/10 of what they should have been.
Having live 120 VAC open wiring across the foundry floor especially when steel plates are involved well , I don't have a problem but some want barrier tape and flashing lights--

I then graduated to a LCR meter REED R5001 LCR Meter

So the stator is very similar to a reactor or a choke , testing using a ohmmeter is more or less useless , and for those interested , that Read LCR meter puts out various frequencies even on ohms, I think from 100 HZ to 100KHZ

Just in case someone thinks, hey lets buy a LCR meter -- sorry it only works with the rotor removed, the magnetic field of the rotor will affect the LCR meter
To go one step further, what my test does is produce a fixed rotating magnetic field across all of the poles at a fixed frequency, ( 2000 RPM ) which should produce identical results in this case Volts AC, provided the winding is identical and the laminations are undamaged.

reactor An electromagnetic device, the primary purpose of which is to introduce inductive reactance into a circuit. ... choke coil An inductor used in a special application to impede the current in a circuit over a specified frequency range while allowing relatively free passage of the current at lower frequencies.
 
#52 ·
Hi to everybody, my Name is Gennaro and write from Italy.
I recenti face a problem on battery recharge on my versys 650 2011. I checked stator resistance and they seems to be good (around 0.3 ohm for each pair), while current is 0 volt. Is it the rotor in fault? Did you experienced the same failure? Is it possible to change this piece with poor mechanics skills? Thanks in advance for all information on get to arrive to this conclusion (rotor in fault)
 
#54 ·
Welcome from Canada
 
#55 ·
Best to go to Technical Discussion / How To Posts/ All Models there are 10 threads under Stator
Unlike what you are asking, a common issue with the V Strom is magnet/rotor failure--the Versys has a less sophisticated regulator compared to Suzuki and is largely part of stator failure. Your 2011 could be wound the old way-around 2011 to 2012 the vendors supplying to Kawasaki upgraded the winding and method of connection, then later upgraded the insulation used to prevent magnet wire movement, and the higher magnet wire temperature insulation now Class H. Versys 007 was class F
Anyone reading this and notice class H is 180'C well here is a note in the link below
Image


#56 ·
Thanks for your fast reply.
I already read your post specifying the steps to test stator failure. My reading was 0 V ad idle, 0.3 V at 4000 RPM. I will repeat this test again following your suggestion, but for sure the reading will be around 0 for each phase.
If I we'll understand what you wrote, in my model could be more likely a problem in the rotor as it is a different class respect to newer version?