Kawasaki Versys Forum banner

Relay Box/ Headlight Relay Failure 2007/Cluster Testing/ Cheap fix/ China Relay

11K views 23 replies 8 participants last post by  Vaiders  
#2 ·
So, I have a 2016 Versys and have been looking high and low for a tutorial/ video on how to install Oxfords or other aftermarket heated grips using the relay. I have an extra relay I was sent when I ordered the gear indicator, power outlet and relay. Help and thank you!
All relays work the same. Pin 87 (the power take off) is energized when the coil receives power. The coil is best triggered by the headlight circuit as it is only live on when the engine is running. You can buy relays complete with wired sockets for about $1 each on ebay or aliexpress.com Since Oxfords have voltage sensing technology to turn themselves off they do not really require a relay and can be connected direct to battery. Oxford kits require no wiring, they are plug and play.

Image


Image
 
#3 ·
Hello everyone!

First of all, I apologize if this has been already posted, I tried to search for this issue but couldn't really find anything relevant.
According to the repair manual, the headlight low beam should only turn on after starting the engine, however on my bike the low beam goes on immediately after switching the ignition to on, and I can even toggle the high beam aswell.
The problem is that my headlight button acts as a switch, turning on the high beam will turn off the low beam so only one of them is active at all times, however the pass button will toggle high beam while pressed, alongside low beam.
During this problem my instrument cluster high beam indicator does not light up, even when the switch is on for high beam.
From my understanding and past experiences high beam and low beam should work together and not just only one of them selectively, right?
All the other lights from the instrument cluster work correctly, so what could cause all these issues? I'm decent with mechanical issues, but electrical stuff always beats me.

Any information is greatly appreciated.

Thank you in advance.
 
#4 · (Edited)
Hello everyone!

First of all, I apologize if this has been already posted, I tried to search for this issue but couldn't really find anything relevant.
According to the repair manual, the headlight low beam should only turn on after starting the engine, however on my bike the low beam goes on immediately after switching the ignition to on, and I can even toggle the high beam aswell.
The problem is that my headlight button acts as a switch, turning on the high beam will turn off the low beam so only one of them is active at all times, however the pass button will toggle high beam while pressed, alongside low beam.
During this problem my instrument cluster high beam indicator does not light up, even when the switch is on for high beam.
From my understanding and past experiences high beam and low beam should work together and not just only one of them selectively, right?
All the other lights from the instrument cluster work correctly, so what could cause all these issues? I'm decent with mechanical issues, but electrical stuff always beats me.

Any information is greatly appreciated.

Thank you in advance.
Testing the headlight relay with key on
Find the stator connector near the throttle position sensor. take it apart, the side going to the main wire harness, connect a positive source with the key on, one close source is the horn, the brown with black tracer is live positive , using a jumper connected to the brown/ black horn and touch each of the 3 wires in the stator connector, one of them operates the headlight relay. One of them should bring the headlight on and it should stay on, if it doesn't come on, the relay may have failed or the headlight relay fuse may be blown. I have a cheap $4 / 40 amp relay work around for the relay box failure if that is what it is.
Low High beam switch is correct for the 2007, the passing switch is correct for the 2007. Turning on the headlight with a key switch only is a problem. Two tests I want you to do, it may require a mirror or a second person, observe if the headlight shuts off momentarily while pushing the start button. Second test is to disconnect the stator output wire socket if the headlight goes out during starting, also disconnect the plug going to the regulator, this will be tough but I don't think you want to replace the relay box if not needed.
Follow the wiring up from the stator, in this photo I have my 07 being tested measuring the AC output voltage, there is a connection between the stator, headlight relay and regulator. I suspect your headlight relay has failed fused closed.
Image
 
#5 ·
Are you the original owner? I can solve your problem but need more info, as well do you have the original stator and OEM regulator?
Hello onewizard, I am not the original owner, just purchased it recently, everything else works perfectly. From what I can tell, the stator cover was never taken off, also the regulator screws appear rusty and very hard to remove, I know it's a double edged sword but I do not think anyone replaced these. the bike has 43000 km at this point. For any other information, just ask and I'll do my best.

EDIT: So you are saying that both low beam and high beam cannot work at the same time ? only one of them of my choosing?
Could the relay being stuck also cause the high beam indicator to not light up on the instrument cluster?
I will attempt to do what you instructed, and will return with an answer tomorrow, as it's 11 PM already here.

EDIT 2: The headlight does appear to go very dim to almost closed when attempting to start the bike, this one at least I remember.
 
#7 ·
Low and high bean can work together. If you select low beam only low will work and if you select high, both low& high will work-2008 model.
2007 the low beam / high beam switch is 1 pole double throw, the passing switch ties to the positive and high beam switch, on high the low is disabled according to the drawing, it has been too long for me to remember.
 
#8 ·
2007 the low beam / high beam switch is 1 pole double throw, the passing switch ties to the positive and high beam switch, on high the low is disabled according to the drawing, it has been too long for me to remember.
will check it out later....you are right 1 pole double throw..but both L/H can also be active, as i said need to check it out.

"STAND TO BE CORRECTED."
 
#9 ·
Thanks for the replies guys! Onewizard, what should I pay attention to when removing the stator plug? The lights just go a little dim when pressing the start button, but not that noticeable, just the normal current draw of the starter causing it.They do not go completely off.

EDIT: double checked with a friend that has the same model, high beam and low beam are both on at the same time when flipping the high beam switch, on his bike

EDIT 2: another weird thing that I tried, i flipped the high beam switch only midway, and both low beam and high beam stay on, flipping it after middle will close the low beam completely. This doesn t seem right
 
#13 ·
I have 07.
Key in with no engine = only city lights, no low beam.
Engine on = LB switch = LB
Engine on = HB switch = LB +HB


Sent from my iPhone using Tapatalk
I just checked my '07-

LB= low beam plus parking lights,

HB= high beam, low and parking lights too.

08 Model:-

Ignition ON- Parking lights ON

Start Idling - Low Beam only.

High Beam - All lights ON, HB /LB/Parking light.

sorry for the late reply.
 
#14 ·
FYI, I asked you to pull the 3 phase connector apart and disconnect the plug to the regulator, as you may have a damaged regulator ( which is powered all the time), you may also have a failed diode in the relay box, by disconnecting these two plugs, if your relay doesn't have

welded contacts, the headlight will remain off during and after starting

Next step would be to plug the 3 phase connector back in if the above test was positive with no light on.

Beyond these two tests, I need feedback from you.
I was off on an unexpected trip with the bike these days however i am gonna attempt this tomorrow Onewizard, wasn't sure what to pay attention to when doing that. I think I can fix the High beam problem from the switch though but the light turning on with the ignition is most likely what you said.

But, do you mean disconnect the stator or pull all those 3 wires from their housing? should I do that and disconnect the regulator while the bike is running? could use some clarification so I don't screw things up. Thank you!
 
#15 ·
in my photo I have some wires going to the meters, simply unplug this connector before
starting the bike, also unplug the plug to the regulator before starting the bike, obviously you will be running off the battery only, so , you need less than a minute to observe the reaction, FYI pay particular attention to the headlight while pushing the start button, as a well charged battery can trigger the headlight relay on release of the start button. I need to know the end result, ie, did the headlight remain off** if yes **proceed to plugging the 3 phase stator plug back in, my suggestion is if the first test is positive, you need less than 30 seconds. Start the bike and do the same observation, if both times the headlight remained on during the whole process the relay is fused closed. I don't want to say more as it could result in confusion.
Thank you for the clarification, will report back with the observations tomorrow, fingers crossed. Also is it normal for this model to have the regulator near the back suspension/swingarm? it really seems weird placed in that swingarm cavity.
 
#16 ·
Thank you for the clarification, will report back with the observations tomorrow, fingers crossed. Also is it normal for this model to have the regulator near the back suspension/swingarm? it really seems weird placed in that swingarm cavity.
Feel lucky it isn't a Ninja, and yes, Kawasaki realized in 2015 that having a regulator near the rear wheel wasn't a good idea unless you lived in the desert. They also realized several locations were prone to electrical corrosion. The 2015 has at least 5 locations covered with rubber to protect from water that never existed on the MK-1.
 
#17 ·
2007 Odd Ball Regulator

So after a flurry of PM I thought I should post this as it is extremely unusual when requesting someone to follow directions when the parts involved are different from anything seen before.
When asked to disconnect the plug to the regulatot there was some confusion and here is why:
Image
 
#19 ·
Cluster Testing/ MK-1

This has come up several times, rather than send a PM I thought I should post some links.There is a considerable amount of info that should be read by anyone with a fan, starter or cluster display problem . The index in the manual skips much of this. Start at 16-54 of the MK-1 service manual
Starting at 16-69 is testing the cluster ( you need to remove it)
16-74 is the start of checking all the LED's in the cluster.
A question pertaining to this post as to high beam is 16-75 Pay attention to the text and the photo's, for high beam #3 is negative, depending if you check further, additional grounds are required, also in all photos, terminal 1&2 are positive in addition.
High Beam Indicator Light (LED) Battery Positive (+) Terminal to Terminal [11]
So for example if you were testing Neutral Indicator Light (LED) Battery Negative (–) Terminal to Terminal [12] plus #3 to negative , and for positive 1&2 .
 
#20 ·
Hello everyone and thanks again for all the replies.

So far, under Onewizard's guidance, I've managed to fix the headlights indicator, here's how it went:

First I tested the instrument cluster itself, and all the LEDs were lighting up and everything was working. While I was testing the wires for resistance, I found that the red wire with black tracer on it had no resistance from the instrumet cluster plug to the waterproof joing under the gas tank (it's the blue plug/socket). The red wire with black tracer belongs to the high beam, dimmer switch and also goes into the instrument cluster to terminal 11 which is the high beam indicator light. Correct me if my expression is wrong.

After this I cut into the protective rubber from the dimmer switch assembly wire harness and inside i found that the red wire the black tracer, red wire with yellow tracer and blue wire with yellow tracer (dimmer switch wires) were cut, and to them the low beam/high beam bulb sockets were directly wired to the leads that go into the dimmer switch, and the other leads were just hanging inside. A previous owner did this and the reason remains unkown to me.

I cut and cleaned every wire and I soldered back together the dimmer switch red wire with black tracer and red wire with yellow tracer with the wires that went into the harness of the same color, which were originally cut. To these wires I soldered back the high beam/low beam plugs and the indicator now works when flashing or turning on high beam.

I did not find the blue wire with yellow tracer's other end, but I will get back to it as this needs to be soldered back aswell so that both LB and HB work simultaneously, I think this is why the previously did not.

I will return with an update once I fix the headlights staying on during ignition (all the time) and not turning off when cranking the engine, as the fix was explained to me, but didn't have enough time to apply, between the indicator problem and other maintenance issues I've encountered.

A special thanks to Onewizard for guiding me and explaining to me how these things work, as I am about as rookie as it gets when it comes to electronics.
 
#21 ·
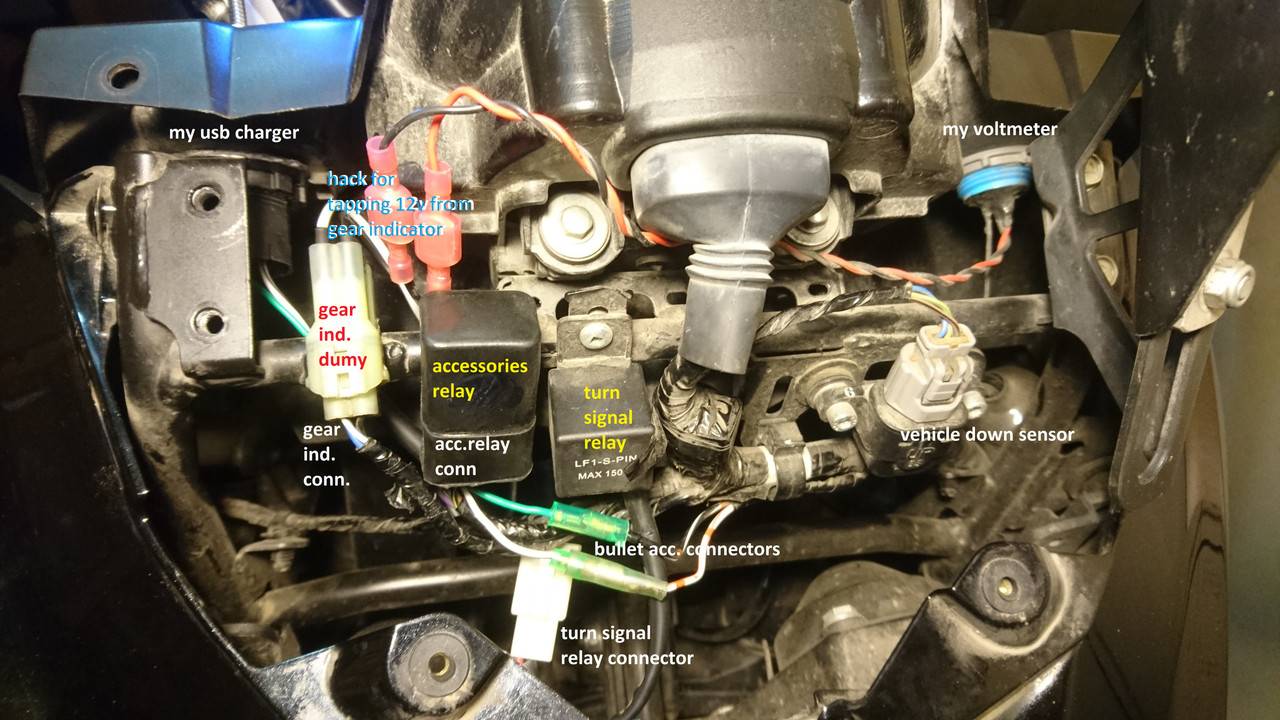
Relay Box Internal cct 16-85

OK guess what, we aren't done, 80 PM later>:), well can't fault him for not asking questions. First I am going to mention this is a MK-1 650 KLE-B 2007. The wiring diagram gives the circuitry but the actual wire connections to the center relay are not all headlight relay specific:surprise:. 16-85 gives the relay box actual wiring, unfortunately you need to be part detective as the pin numbers do not have a colour code, the main drawing has colour but no pin numbers, the actual sockets do not have a reference to either pin or colour.
So below is what I found specific to 16-85
#1 Blue/ Yellow goes to headlight dimmer and low beam / passing switch
#2 Black from the 3 phase output of the stator ( this is the wire that gets cut and taped when installing a Polaris regulator)
#3 Grey from cct.#5 10 amp headlight relay fuse
#6 cct#3 15 amp ECU fuse White / Black to ECU relay contact
#7 Brown / White also to ECU controller
#8 White / Red fuel pump + power

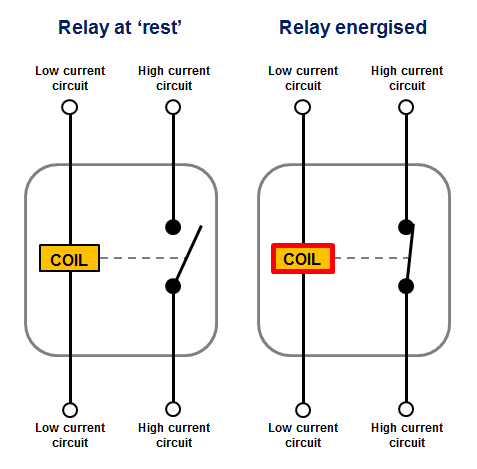
The question was asked why the headlight relay is prone to failure when the other relays seldom fail.
Electrical 101 : I am sure everyone on this forum has been around incandescent lights in their lifetime, have you ever noticed when say a existing light in a room (already on ) blinks for a fraction of a second when another light is turned on?? The reason for this is inrush current and if you were to measure a 100 watt light bulb ( 120 VAC )with a ohm meter , it would measure roughly 12 ohms. So watts is voltage times current. To find current divide ohms into volts , so 120 / 12 = 10 amp . 10 amp X 120 volts = 1200 watts , yes 10 times the running current, that is why you see the light blink in your house and why the headlight relay contact fails faster than any other relays. LED bulbs do not have inrush current and the higher the voltage the lower the current i.e. when keying on my Denali lights draw more current than when the bike is running and the regulator puts out 14.2 VDC, the reason is most LED lights have a voltage range they function in and have their own regulator built in or a separate driver
 
#22 ·
Hello guys!

So, we finally fixed this, my headlights were actually wired into the ignition, so they always come on and stay on when turning the key into the 'on' position. We found out later that the headlight relay was actually fused closed, and the headlights would not come on no matter what. This is actually a common issue with this relay, I saw a couple of posts were people replaced the relay box because the headlights did not come on after starting the engine. After I soldered everything back they way it was from the factory, we proceeded with the fix, as follows:

  • a 12v 40 amp 5 pin relay is needed for this (this relay will have the following numbers usually next to it's pins #85 #30 #86 #87 #87A)
  • a socket with the harness should be purchased with the relay if it does not include one
  • the following wires get cut from the Kawasaki harness that plugs into the relay box: Grey wire from pin #3, Blue wire with yellow tracer from pin #1 and the Black wire from pin #2 (Black wire gets taped up, for later use with Polaris regulators, as mentioned above)
  • on my harness, the ground from the starter solenoid, Yellow wire with red tracer, was located on the 10 pin socket of the relay box, pin #11
  • the new relay's wires that go onto the #85 and #30 pins, together, get soldered to the Kawasaki Grey wire from pin #3
  • the new relay's wire that goes onto the #87 pin gets soldered to the Kawasaki Blue wire with yellow tracer from pin #1
  • the new relay's wire that goes onto the #86 pin has to be tapped in and soldered directly on the Yellow wire with red tracer from the starter solenoid (found on the 10 pin socket on my bike), a little wire insulation has to be removed, this must not be cut
  • the 3 sockets from the relay box must remain plugged in after doing this, at least on my bike.

Thanks to everyone who replied here, and again, a special thanks to onewizard for guiding and helping me through this, hopefully this method he came up with will help some people save some cash in the future, and learn something more about their bikes, as I did.

Below you can find some photos of how the scheme looks for my bike, the installed relay, and a video of this actually works; the headlights turn on when turning the key to the on position, turn off while cranking the engine, and turn back on when the bike is started.


Image
Image

Image
Image

Image