Before you start to remove the cam cover bolts, view post #8&9 of https://www.kawasakiversys.com/foru...om/forums/74-how-forum/133514-valve-shim-vacuum-sync-2015-650abs-onewizard.html Note 2 over T and 1 over T and the valve timing marks. The proper place to do the work is at valve timing marks shown and 2 Over T position
Added this Feb. 2019 Onewizard
I appear to have lost a cylinder shaped sleeve in the process of inspecting valve clearance. I want to confirm that I am missing it before going into tearing about the bottom end looking for it. I have attached a pic in which above the #1 exhaust valve there is not a sleeve for the camcap bolt, but there is a sleeve for the other three. The missing one is marked with a ?
I have fairly thoroughly visually inspected the head for the damn thing and can't find it. I am wondering if it would even fit down the timing chain gap anyway....
![Image]()
Anyone have any experience they can share with this would be appreciated. From a second opinion that I do indeed need to tear into this bottom end and find the missing piece, or advice that would otherwise rule that need out. For instance, there is no way that piece could fit down into the timing chain gap to it should only have three of these things anyhow.
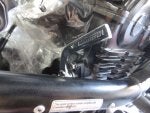
Added this Feb. 2019 Onewizard
I appear to have lost a cylinder shaped sleeve in the process of inspecting valve clearance. I want to confirm that I am missing it before going into tearing about the bottom end looking for it. I have attached a pic in which above the #1 exhaust valve there is not a sleeve for the camcap bolt, but there is a sleeve for the other three. The missing one is marked with a ?
I have fairly thoroughly visually inspected the head for the damn thing and can't find it. I am wondering if it would even fit down the timing chain gap anyway....

Anyone have any experience they can share with this would be appreciated. From a second opinion that I do indeed need to tear into this bottom end and find the missing piece, or advice that would otherwise rule that need out. For instance, there is no way that piece could fit down into the timing chain gap to it should only have three of these things anyhow.