I know many of you here have removed your wheels before and this is second nature to you. But there are also lots of new owners here who may be unsure about doing their own maintenance / service to their machines. I’m a new motorcycle rider, this is my first bike, and it’s time for new tires. I wanted to remove my wheels myself, and I thought I would document with pictures the process in case anyone else might find this helpful. It took me less than an hour to remove the wheels, and that includes taking the pictures as well. The DIY thread on oil changes kind of prompted me to do this. I got most of this from this and other forums, but these are the first pics I’ve seen with the Versys (most pics were Ninjas). Hope you like it.
Jack
Tools needed:
Rear/Front stand (NOTE: I didn’t have the triple-tree front stand adapter and didn’t need it).
Torque wrench
Cable ties or twine
22mm socket
27mm socket
12mm socket
6mm hex bit
14mm hex bit
12mm open end wrench
Pliers
High temp grease
Torque specs:
Rear axle = 80 ft/lb
Rear brake caliper mounting bolts = 18 ft/lb
Front axle = 80 ft/lb
Front axle clamp bolt = 15 ft/lb
Front axle caliper mounting bolts = 25 ft/lb
Rear Wheel Removal:
1. Use the rear stand to raise the back end and remove the cotter pin in the rear axle.
2. Using the 6mm hex bit, remove the two bolts on the rear brake caliper. Tie the brakes up out of the way using cable ties or twine. BE SURE NOT TO PUSH THE BRAKE PEDAL! This will compress the brake pads and make it difficult to re-install.
3. Using the 12mm open-end wrench, loosen the chain adjuster bolt locknuts and then tighten the chain adjuster bolt. This will release any tension on the axle.
4. Remove the rear axle. This will require a 22mm socket on the right side and a 27mm socket on the left. A breaker bar will be helpful to loosen the axle. It’s helpful to use a piece of wood to support the weight of the wheel as you pull the axle bolt out.
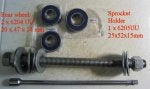
5. Be sure to note the spacers on the wheel between the swingarm and the wheel. Remove them so they don’t get lost. These will need to be greased before reinstalling. Also the rear caliper mount will become loose. Set it to the side for reinstallation later.
6. Roll the wheel forward to loosen and remove the chain from the sprocket and remove the wheel.
7. Installation is the reverse of removal. Be sure to replace the caliper mount and adjust the chain to the proper tension. It’s helpful to snug the axle so that there is less free play and then fine tune the chain tension. Be sure to torque the axle to 80 ft/lb and re-insert the cotter pin. Reinstall the rear brake assembly and torque the caliper mounting bolts to 18 ft/lb.
Front Wheel Removal:
1. While the bike is still on the rear stand (but before putting it on the front stand), loosen the front axle clamp bolt with a 6mm hex bit. You do not need to remove it fully, just be sure it’s loose.
2. Using the 14mm hex bit, loosen the front axle bolt. A breaker bar makes this step easier. Once it is loose you can go ahead and place the motorcycle on the front stand.
3. Using the 12mm socket, remove the front brake caliper mounting bolts. Once you have the brake off of the rotor, replace the bolts back in the caliper to prevent losing them. Hang the brake using cable ties or twine. BE SURE NOT TO PUSH THE BRAKE PEDAL! This will compress the brake pads and make it difficult to re-install. Repeat the process for the other side.
4. Once the brakes are tied off out of the way, finish removing the front axle bolt. It’s helpful to use some wood to support the wheel while removing the axle bolt. Be sure to note the spacers on the wheel between the forks and the wheel. Remove them so they don’t get lost. These will need to be greased before reinstalling.
5. Installation is the reverse of removal. Be sure to replace the calipers and torque them to 25 ft/lb. Once the front axle bolt has been torqued to 80 ft/lb, be sure to drop the front to the ground and bounce the front forks 4-5 times. This will seat the forks on the axle. Then you can tighten the front axle clamp bolt to 15 ft/lb.
The last couple of pics are of the old & new tires I got. You can see why it’s time to replace the old ones, and that’s with only 6,000 miles. I definitely hope to get a few more miles out of the new ones. Hoped you found this helpful.
Jack
Tools needed:
Rear/Front stand (NOTE: I didn’t have the triple-tree front stand adapter and didn’t need it).
Torque wrench
Cable ties or twine
22mm socket
27mm socket
12mm socket
6mm hex bit
14mm hex bit
12mm open end wrench
Pliers
High temp grease
Torque specs:
Rear axle = 80 ft/lb
Rear brake caliper mounting bolts = 18 ft/lb
Front axle = 80 ft/lb
Front axle clamp bolt = 15 ft/lb
Front axle caliper mounting bolts = 25 ft/lb
Rear Wheel Removal:
1. Use the rear stand to raise the back end and remove the cotter pin in the rear axle.
2. Using the 6mm hex bit, remove the two bolts on the rear brake caliper. Tie the brakes up out of the way using cable ties or twine. BE SURE NOT TO PUSH THE BRAKE PEDAL! This will compress the brake pads and make it difficult to re-install.
3. Using the 12mm open-end wrench, loosen the chain adjuster bolt locknuts and then tighten the chain adjuster bolt. This will release any tension on the axle.
4. Remove the rear axle. This will require a 22mm socket on the right side and a 27mm socket on the left. A breaker bar will be helpful to loosen the axle. It’s helpful to use a piece of wood to support the weight of the wheel as you pull the axle bolt out.
5. Be sure to note the spacers on the wheel between the swingarm and the wheel. Remove them so they don’t get lost. These will need to be greased before reinstalling. Also the rear caliper mount will become loose. Set it to the side for reinstallation later.
6. Roll the wheel forward to loosen and remove the chain from the sprocket and remove the wheel.
7. Installation is the reverse of removal. Be sure to replace the caliper mount and adjust the chain to the proper tension. It’s helpful to snug the axle so that there is less free play and then fine tune the chain tension. Be sure to torque the axle to 80 ft/lb and re-insert the cotter pin. Reinstall the rear brake assembly and torque the caliper mounting bolts to 18 ft/lb.
Front Wheel Removal:
1. While the bike is still on the rear stand (but before putting it on the front stand), loosen the front axle clamp bolt with a 6mm hex bit. You do not need to remove it fully, just be sure it’s loose.
2. Using the 14mm hex bit, loosen the front axle bolt. A breaker bar makes this step easier. Once it is loose you can go ahead and place the motorcycle on the front stand.
3. Using the 12mm socket, remove the front brake caliper mounting bolts. Once you have the brake off of the rotor, replace the bolts back in the caliper to prevent losing them. Hang the brake using cable ties or twine. BE SURE NOT TO PUSH THE BRAKE PEDAL! This will compress the brake pads and make it difficult to re-install. Repeat the process for the other side.
4. Once the brakes are tied off out of the way, finish removing the front axle bolt. It’s helpful to use some wood to support the wheel while removing the axle bolt. Be sure to note the spacers on the wheel between the forks and the wheel. Remove them so they don’t get lost. These will need to be greased before reinstalling.
5. Installation is the reverse of removal. Be sure to replace the calipers and torque them to 25 ft/lb. Once the front axle bolt has been torqued to 80 ft/lb, be sure to drop the front to the ground and bounce the front forks 4-5 times. This will seat the forks on the axle. Then you can tighten the front axle clamp bolt to 15 ft/lb.
The last couple of pics are of the old & new tires I got. You can see why it’s time to replace the old ones, and that’s with only 6,000 miles. I definitely hope to get a few more miles out of the new ones. Hoped you found this helpful.