

OK, there really isn't any black magic involved. No, really.
The suspensions main task, from a performance perspective is to keep the wheels in contact with the ground as much as possible and minimize the bike's movement, or at least keeping those movements under control. There are several adjustments when you are dealing with high quality suspensions (unfortunately, neither end on the Versys qualifies as such) and they all work together. Adjusting only one element is going to have limited effect.
First you have to understand what each component and adjustment does for your suspension:
Despite the common (mis)use in motorcycle language, preload does not affect spring stiffness, but you will see thousands of references to "making the suspension stiffer/softer" by changing preload. In reality, preload affects mainly at which point in the suspension travel you are in equilibrium (static or race sag, depending on whether you measure with/without the rider) and therefore, ride height. Setting the correct preload puts the suspension in it's optimal working range (too much preload and it tops out easily because you start very high on the suspension stroke; not enough preload and you are down towards the lower half of the suspension travel, making it easier to bottom out) but also puts more/less load on the front and rear, which means you have more/less weight acting on that particular spring. Unfortunately, colloquially, people refer to adding/removing preload as stiffening or softening the suspension, so many riders actually think that is a direct effect of adding or removing preload, instead of thinking of it as a suspension travel adjustment (and indirectly ride height).
Damping is what controls the spring movement. If there was no damping the bike would keep bouncing up and down uncontrollably (think old American cars...). Compression damping is what slows down the suspension movement as it compresses (yeah, I know, duh!) to absorb a bump. It can also be broken into low and high speed damping (referring to fork/shock movement, not actual vehicle speed). Low speed damping affects what happens most of the time when you ride on relatively good roads, the fork moves up and down at a low rate to deal with road changes. When you hit a sharp bump, the forks compress rapidly and that's when high speed damping comes into play. Sophisticated suspensions have a secondary circuit that opens when the pressure rises rapidly, making the fork/shock more compliant. Most OEM setups are not that sophisticated, so you have more oil trying to rush through the same orifices, resulting in a hydraulic lock of sort, creating harsh feeling suspension.
Rebound damping controls the shock/fork movement as it expands. Low rebound will allow the suspension to extend rapidly and create a lot of movement as the bike bounces back. Too much rebound will keep the fork/shock from fully extending fast enough to deal with the next road irregularity with the full suspension stroke. So, if you set rebound damping low, the bike will move around more, but it's not "softer" because rebound doesn't really affect what happens when you first hit a sharp bump, that's handles by the spring and compression damping.
It's important to note that when doing any suspension work, it's best to do one thing at a time, make one change and go out to test it. Use the same loop under the same conditions when testing. Take notes of the changes you make. This will make it easier to compare changes and also allow you to easily dial it back to the starting point if you don't like the result.
OK, great, but what do I do with all this information?
Using this information you can understand what happens when you set the sag and damping rates on your bike.
Measuring sag is simple, you'll need an assistant (two is better), a measuring tape (I always recommend a metric one, it's easier figure out the differences with decimal units) a note pad and a simple calculator (if you are not good doing math in your head).
Lets define some measurements:
L1 = Total suspension travel
L2 = Available travel
L3 = Rider Sag (L1-L2)
Total suspension travel is usually given in the bike's specs (for the Versys - 150mm), but the actual available distance from the bottom of the forks is a little longer than that - you can measure it by leaning the bike on the side stand and pulling until there is no load on the front wheel. Obviously, this requires at least two people for safety reasons (both yours and the bike's). If are measuring on your own, use the manufacturers specs plus 20mm. Note that there will be a small discrepancy between the measured full extension and the spec as there always is some slack in the fork when it's fully extended. If you are getting what seems like little sag, check the fully extended length of the lower fork.
If you have two assistants:
- Sit on the bike with your typical riding gear.
- Have one of the assistants hold the bike up so you can put both your feet on the pegs and sit in your normal riding position.
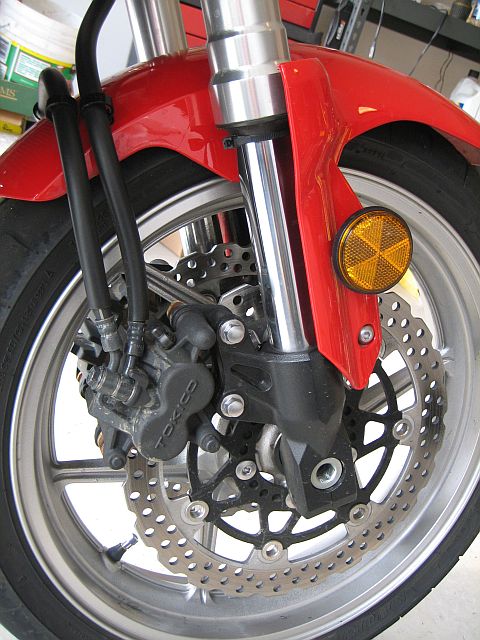
If like me, you have no friends, you can use a zip-tie loosely fastened around the fork lower to measure displacement. In that case, push the zip-tie all the way against the fork seal, carefully straighten the bike and sit on it taking care to not move the suspension up or down.
![Image]()
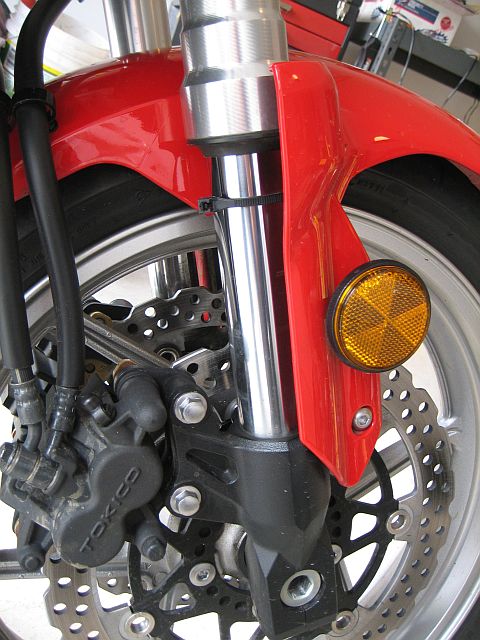
Try to balance for a second or two, again, taking care to not bounce the suspension up and down as you do so. I recommend you try this several times, as it takes a little practice to balance for more than an instant without needlessly moving the suspension. When you get off the bike, again, take care not to bounce the suspension around. You should see something like this:
![Image]()
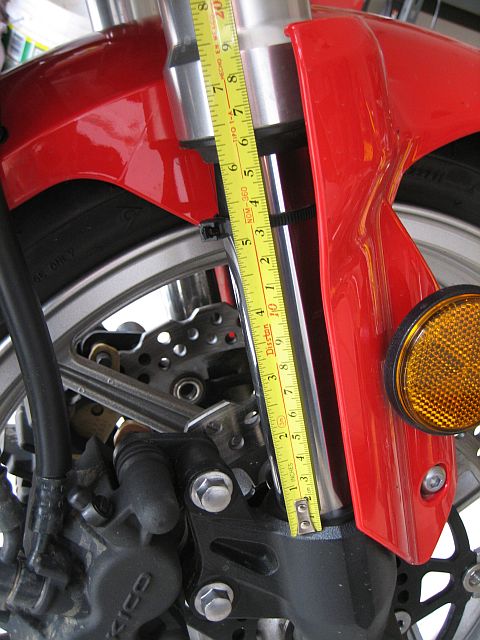
- Measure how much the front suspension is compressed (easy to do directly on forks, you simply measure from the length of exposed inner tube from the dust seal to the top of the axle holder or from the zip-tie to the top of the axle holder). The difference between available travel (exposed length, L2) and the total travel (L1) is your sag.
![Image]()
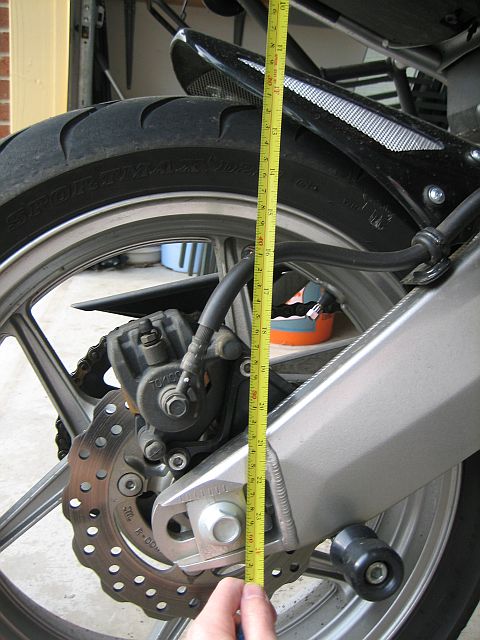
- Measuring rear sag is similar, but can't be done directly due to the setup, so what we measure is the distance the rear axle travels and use that. In order to have meaningful measurements you need to get a baseline measurement that tell you the distance between some point on the rear axle (I often use the center or top of the axle nut) and some fixed point on the rear subframe, that is located vertically above that spot on the axle (when you are looking at the bike it's a lot simpler than it sounds). The bolting point for the passenger pegs to the subframe is close enough to vertical that you can use that, or any other spot on the rear subframe would work too, as long as you consistently use that same spot when you measure.
![Image]()
- An easy way to measure the fully extended length in the rear is pull the bike toward you when you are standing on the left side of the bike (with bike on side stand), until the rear wheel starts coming off the ground (of course, if you are measuring a bike that has a center stand, this is trivial, you just set it on the stand and the rear wheel is in the air). Measure the distance between your selected two spots. This is your L1*.
- Now sit on the bike again, have one of your assistants hold the bike up, put your feet on the pegs as you would while riding and have the second assistant measure the distance between those two spots again. This is L2*. The difference between L1* and L2* is your sag (Sag = L1*-L2*).
The range for sag on a Versys should be -
Front - 25%-33% compression (or 37.5-49.5mm out of a total of 150mm travel available)
Rear - 25%-35% compression (or 36-51mm out of a total of 145mm travel available)
If your measurements fall within this range and you are satisfied with how the bike feels, you are done (at least as far as preload is concerned). If your measurements are outside these ranges, you need to adjust preload and measure again. If you don't have enough compression, remove preload (forks - clockwise adds preload, counterclockwise removes it, rear shock - 1 is min preload, 7 max preload), if you have too much compression add more preload.
As I mentioned above, the initial sag setup are good starting points, but you can set it anywhere in that range and still have good suspension performance. Some people like their bikes to ride taller, others lower with more or less damping. I start at the middle of the range (useful to write down what settings you started with, so you can go back later if you don't like the changes you make over time) and usually go towards the upper end, i.e. less sag because I like to keep clearance at maximum.
Hope this helps, feel free to ask for clarifications if I lost you somewhere in the process...
Gustavo
The suspensions main task, from a performance perspective is to keep the wheels in contact with the ground as much as possible and minimize the bike's movement, or at least keeping those movements under control. There are several adjustments when you are dealing with high quality suspensions (unfortunately, neither end on the Versys qualifies as such) and they all work together. Adjusting only one element is going to have limited effect.
First you have to understand what each component and adjustment does for your suspension:
Despite the common (mis)use in motorcycle language, preload does not affect spring stiffness, but you will see thousands of references to "making the suspension stiffer/softer" by changing preload. In reality, preload affects mainly at which point in the suspension travel you are in equilibrium (static or race sag, depending on whether you measure with/without the rider) and therefore, ride height. Setting the correct preload puts the suspension in it's optimal working range (too much preload and it tops out easily because you start very high on the suspension stroke; not enough preload and you are down towards the lower half of the suspension travel, making it easier to bottom out) but also puts more/less load on the front and rear, which means you have more/less weight acting on that particular spring. Unfortunately, colloquially, people refer to adding/removing preload as stiffening or softening the suspension, so many riders actually think that is a direct effect of adding or removing preload, instead of thinking of it as a suspension travel adjustment (and indirectly ride height).
Damping is what controls the spring movement. If there was no damping the bike would keep bouncing up and down uncontrollably (think old American cars...). Compression damping is what slows down the suspension movement as it compresses (yeah, I know, duh!) to absorb a bump. It can also be broken into low and high speed damping (referring to fork/shock movement, not actual vehicle speed). Low speed damping affects what happens most of the time when you ride on relatively good roads, the fork moves up and down at a low rate to deal with road changes. When you hit a sharp bump, the forks compress rapidly and that's when high speed damping comes into play. Sophisticated suspensions have a secondary circuit that opens when the pressure rises rapidly, making the fork/shock more compliant. Most OEM setups are not that sophisticated, so you have more oil trying to rush through the same orifices, resulting in a hydraulic lock of sort, creating harsh feeling suspension.
Rebound damping controls the shock/fork movement as it expands. Low rebound will allow the suspension to extend rapidly and create a lot of movement as the bike bounces back. Too much rebound will keep the fork/shock from fully extending fast enough to deal with the next road irregularity with the full suspension stroke. So, if you set rebound damping low, the bike will move around more, but it's not "softer" because rebound doesn't really affect what happens when you first hit a sharp bump, that's handles by the spring and compression damping.
It's important to note that when doing any suspension work, it's best to do one thing at a time, make one change and go out to test it. Use the same loop under the same conditions when testing. Take notes of the changes you make. This will make it easier to compare changes and also allow you to easily dial it back to the starting point if you don't like the result.
OK, great, but what do I do with all this information?
Using this information you can understand what happens when you set the sag and damping rates on your bike.
Measuring sag is simple, you'll need an assistant (two is better), a measuring tape (I always recommend a metric one, it's easier figure out the differences with decimal units) a note pad and a simple calculator (if you are not good doing math in your head).
Lets define some measurements:
L1 = Total suspension travel
L2 = Available travel
L3 = Rider Sag (L1-L2)
Total suspension travel is usually given in the bike's specs (for the Versys - 150mm), but the actual available distance from the bottom of the forks is a little longer than that - you can measure it by leaning the bike on the side stand and pulling until there is no load on the front wheel. Obviously, this requires at least two people for safety reasons (both yours and the bike's). If are measuring on your own, use the manufacturers specs plus 20mm. Note that there will be a small discrepancy between the measured full extension and the spec as there always is some slack in the fork when it's fully extended. If you are getting what seems like little sag, check the fully extended length of the lower fork.
If you have two assistants:
- Sit on the bike with your typical riding gear.
- Have one of the assistants hold the bike up so you can put both your feet on the pegs and sit in your normal riding position.
If like me, you have no friends, you can use a zip-tie loosely fastened around the fork lower to measure displacement. In that case, push the zip-tie all the way against the fork seal, carefully straighten the bike and sit on it taking care to not move the suspension up or down.
Try to balance for a second or two, again, taking care to not bounce the suspension up and down as you do so. I recommend you try this several times, as it takes a little practice to balance for more than an instant without needlessly moving the suspension. When you get off the bike, again, take care not to bounce the suspension around. You should see something like this:
- Measure how much the front suspension is compressed (easy to do directly on forks, you simply measure from the length of exposed inner tube from the dust seal to the top of the axle holder or from the zip-tie to the top of the axle holder). The difference between available travel (exposed length, L2) and the total travel (L1) is your sag.
- Measuring rear sag is similar, but can't be done directly due to the setup, so what we measure is the distance the rear axle travels and use that. In order to have meaningful measurements you need to get a baseline measurement that tell you the distance between some point on the rear axle (I often use the center or top of the axle nut) and some fixed point on the rear subframe, that is located vertically above that spot on the axle (when you are looking at the bike it's a lot simpler than it sounds). The bolting point for the passenger pegs to the subframe is close enough to vertical that you can use that, or any other spot on the rear subframe would work too, as long as you consistently use that same spot when you measure.
- An easy way to measure the fully extended length in the rear is pull the bike toward you when you are standing on the left side of the bike (with bike on side stand), until the rear wheel starts coming off the ground (of course, if you are measuring a bike that has a center stand, this is trivial, you just set it on the stand and the rear wheel is in the air). Measure the distance between your selected two spots. This is your L1*.
- Now sit on the bike again, have one of your assistants hold the bike up, put your feet on the pegs as you would while riding and have the second assistant measure the distance between those two spots again. This is L2*. The difference between L1* and L2* is your sag (Sag = L1*-L2*).
The range for sag on a Versys should be -
Front - 25%-33% compression (or 37.5-49.5mm out of a total of 150mm travel available)
Rear - 25%-35% compression (or 36-51mm out of a total of 145mm travel available)
If your measurements fall within this range and you are satisfied with how the bike feels, you are done (at least as far as preload is concerned). If your measurements are outside these ranges, you need to adjust preload and measure again. If you don't have enough compression, remove preload (forks - clockwise adds preload, counterclockwise removes it, rear shock - 1 is min preload, 7 max preload), if you have too much compression add more preload.
As I mentioned above, the initial sag setup are good starting points, but you can set it anywhere in that range and still have good suspension performance. Some people like their bikes to ride taller, others lower with more or less damping. I start at the middle of the range (useful to write down what settings you started with, so you can go back later if you don't like the changes you make over time) and usually go towards the upper end, i.e. less sag because I like to keep clearance at maximum.
Hope this helps, feel free to ask for clarifications if I lost you somewhere in the process...
Gustavo


