Kawasaki Versys Forum banner

Instrument Cluster/ Repair/ Mode-Reset Button /Odometer Change MPG / KM/L

1 reading
9.5K views 64 replies 34 participants last post by  onewizard  
#1 ·
I got tired of waiting for Kawasaki NZ to get a new speedo unit in so I took my one apart and squirted a small amount of CRC into the switch units and pushed them in and out a few times. Put the unit back together and the button is now working. I wonder if some moisture had found its way into the switch and the CRC cleared it. Two weeks on and all is working well. Four weeks on and still no warranty replacement arrived yet. When it does I will keep it as a spare in case my repair doesn't last.
 
#3 ·
Hello, I had the same problem. I disconnected the speedo, opened it and I found out that the piece of plastic that is moving has to be positionned in a certain way to work. I tried to insert a small piece of plastic to force the plastic pin to stay straight and it worked. My button now work again and I am glad!

For your information, the Mileage is stored in the ECU unit. When I disconnected the speedo, my battery was still on. The only thing that reseted were the Trip meters and the Clock. The mileage stayed as is once reconnected.

Unfortunately, I did not take pics but I will be happy to explain better if anybody is interested...
 
#4 ·
My new instrument cluster arrived yesterday. I had to fit it and return the old one otherwise the shop couldn't get a refund under warranty. My CRC repair was still working fine.
The new speedo wasn't able to be cranked up to 10,000 kms so I am back to zero.
About NZ$1000 for the new one.
 
#6 ·
CRC is non-conductive electrical contact cleaner. Stuff is great!
 
#8 ·
I didn't take the actual switch apart. I just seperated the plates so I could get a look at the switch and realising I couldn't dismantle it , squirted a little CRC into the base of the switch. I then pushed the switch on and off a few times and put the speedo unit back together.
It continued to work fine and showed no signs of any further trouble.
 
#9 ·
Instrument Cluster/ Repair/ Mode-Reset Button

I own a relatively new '09 model with only 1400 miles on it, and the dreaded harmonic buzz emanating from the cowling area at around 4500rpm has been active on this bike for about half its life.

This kind of thing DRIVES ME CRAZY!

I have owned previous bikes with harmonic buzzing, and I've always been able to find and fix the source.

I almost gave up on finding the buzz on this Versys, but after a lot of effort I was successful.

The search process started as usual, trying to physically touch and thus quiet the offending piece while riding. Next, I tried revving the bike while parked to try and identify the buzz.

I could not find the buzz. Frustrating...

Next, I tried to be unorthodox, and applied Dynamat to the upper-inside of the gauge cowling, as well as the insides of the side-front cowlings. I went out and test rode the bike. Result, I wasted $20 on Dynamat.

Image


Image


So, the cowlings came off again. I started rapping lightly on the metal cowling/gauge frame with a rubber mallet. I could hear the instrument gauge unit buzzing lightly each time I did this. However, touching the gauges while rapping did not reduce the buzz.

This is an "AH-HA! I GOT YOU NOW, YOU LITTLE BASTARD!!" moment.

The buzz is coming from INSIDE the instrument gauge unit.

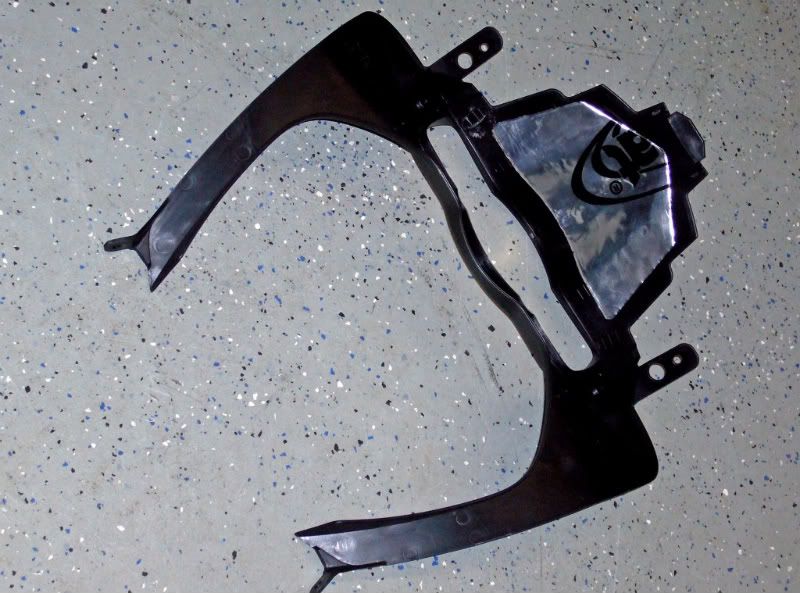
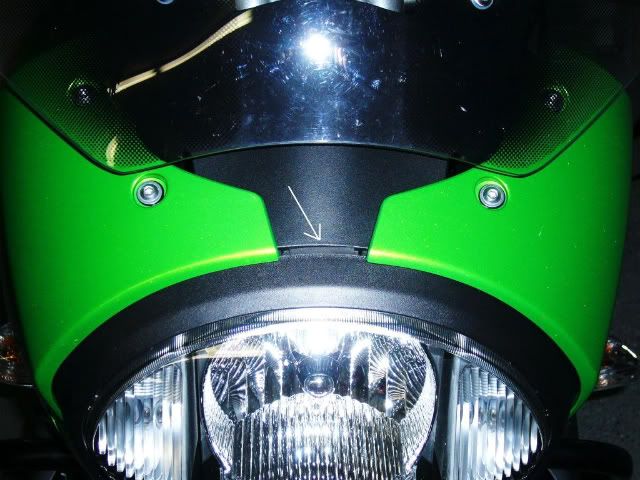
So, I removed the headlight to access removal of the gauge housing.

Image


Image


Then I removed the 9 screws on the back side of the gauge housing. Don't be afraid to do this. It is very easy and nothing falls apart or is difficult to put back together. No seals are broken either, so no worries.

Image


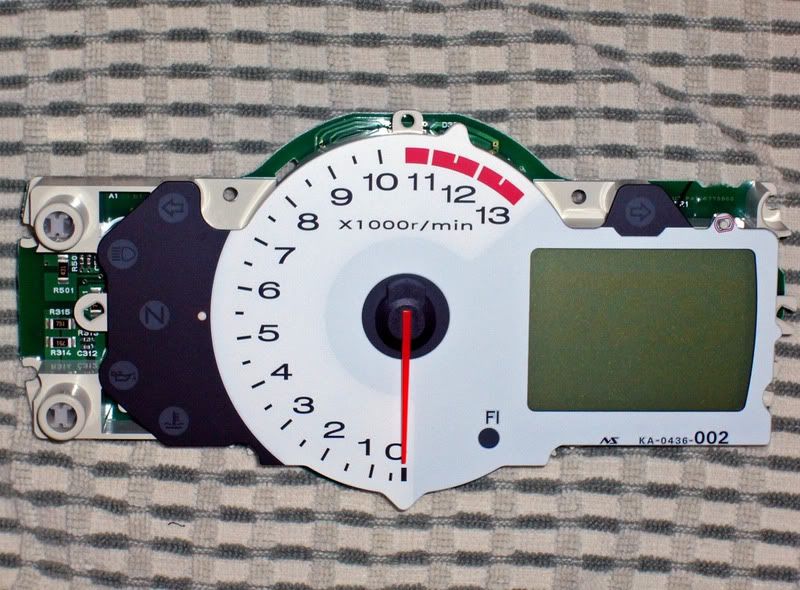
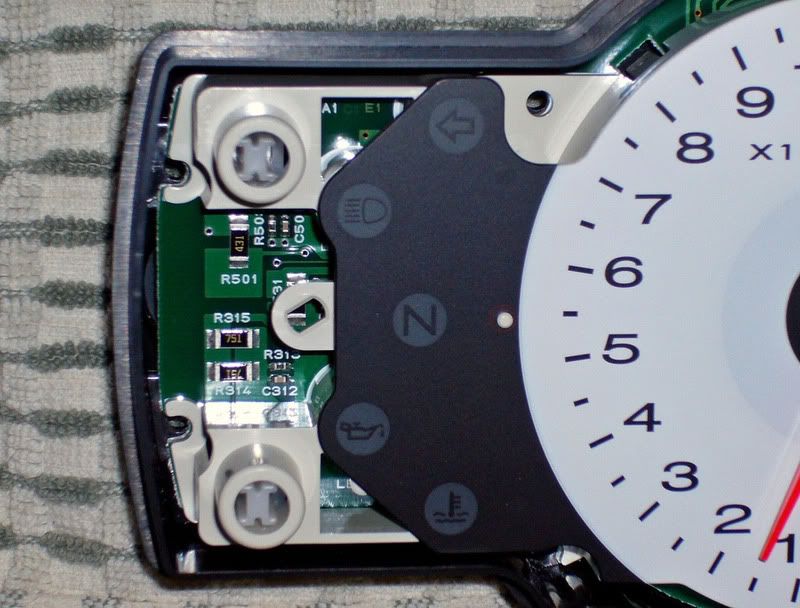
I found 2 possible buzz sources inside the housing.

The first source is less likely, but I fixed it anyway; the white face of the gauges "floats" on top of the inner gauge body without really being very secure, even when it is sandwiched between the top and bottom of the gauge cases, so it still has a slight gap around most of its outer edge. I fixed this potential buzz source by minimally tack welding the white gauge-face edges to the inner gauge body using superglue. Easy, and I can easily use a razor to break the bond if I need to replace bulbs later.

Image


The second possible buzz source was definitely causing most, if not all of the gauge buzzing. Looking at the picture below, you will see the two housings for the "Mode" and "Reset" micro-switches. The little "X"-looking pieces inside the round tube of the switch housing have too much free-play inside the round tubes. When the bike engine revs, the "X" pieces rattle against the inside of the round switch tubes.

Image


So, I found the main buzz problem, but how did I fix it without affecting the performance of the two switches? That is the question.

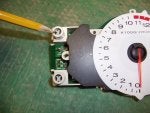
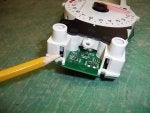
The answer; with 2 small pieces of 1/4" heat-shrink tubing, slid between the "X" portion of the switch and the inner wall of the round switch housing. Looking at the picture below, you will see the top switch has the shrink tubing already installed, and the lower switch still needs to have the shrink tubing slid down into place. The shrink tubing must be cut short enough to allow the switches to function. If the shrink tubing is too tall it will limit switch function. Once the tubing was in place I heated it a little to keep it there. There is still enough play in the switch, but the "X" no longer rattles in the round switch housing.

Image


So, I put the gauge unit back together, and tested the "Mode" and "Reset" switches before I installed the gauge unit. I reassembled everything else to the bike. A test ride revealed that I had indeed fixed the problem. No more buzzing, just the ability to enjoy the sound of the engine. :cheers:

If you want to test this potential buzzing source on your bike, try holding these switches down simultaneously while riding and hearing the buzz. If the noise stops, you know how to fix it.
 
#11 ·
I used Enigma's cure for the dash buttons except I used a drinking straw instead........this is a sure-fire fix for the gauge buzzing, thanks Enigma for the solution!!
I'm glad it worked.

I like your straw idea better than the shrink tube method. The straw would probably be less likely to cause issue with button function due to its smoother and more rigid surface.
 
#12 ·
Element,

Is this the area you are referring to?

Image


If this is what you are referring to, your specific fix is actually pretty commonly done and talked about by Versys owners experiencing the buzzing. I also tried that fix, but it did not quiet the noise.

The parallel twin of the Versys seems to create a vibration/noise problem for many Versys owners. Your fix works some of the time for some of us.

I posted my fix because I had not yet heard of it, and because it actually worked for me. If it doesn't work for others, then there is probably another source of vibration that will also need addressing.

That is the spot; I have missed the others that have tried it. Guess all the V's are different, but that totally fixed mine.
 
#13 ·
This problem has popped up before. I have a theory and a possible fix for it. When I had the gauge cluster apart to fix the buzzing, I saw how the reset and select buttons work. When pushing the buttons, it is not a direct contact with the switch. Instead, it pushes against a very small piece of a plastic pin about 3/8" long that rides in a plastic tube. This is a very loose fit with a lot of slop and it may be getting cocked inside the plastic tube. The "drinking straw" repair method for eliminating the buzzing noise could also correct this by reducing the inside diameter of the tube and help to keep that plastic pin centered.
 
#14 ·
Instrument Cluster/ Repair/ Mode-Reset Button

I'm sure I'm not the only one who finds it awkward to reach the mode button and hit it cleanly, especially on a winding road.

So I decided to do something about it.

I opened up the instument pod and took out the main board. Using a small 2-strand wire, I soldered the 2 wires to either side of the open circuit under the mode switch.

I opened up the left handlebar control module and disconnected the 2 wires from the "Pass" button. I soldered the other end of my 2-strand wire to the Pass button.

Now when I pull the Pass button, the mode on the dash changes.

The small wire I used was from a motorcycle radar detector helmet speaker wire. It had a small waterproof quick disconnect in the middle, which I positioned just outside the instrument pod. This allows the instrument pod to still be unplugged and removed from the bike.

Maybe this will inspire others to do something similar. Any momentary button could be used in place of the Pass button, such as an accessory horn button.

Michael
 
#16 ·
My new replacement speedo decided to stop working after only 3000 kms so I split it open and did the spray with CRC again. Just a small squirt into each button mechanism and everything was back to normal again. Still working 5 months on.
I think this is a permanent fix. See my previous posts in this thread.
 
#17 ·
Instrument Cluster/ Repair/ Mode-Reset Button

seen in another thread somewhere here that guys where having troubles with these, and trying to get new ones under warranty, and one guy told how he fixed it but had no pics.

mine was doing it also, so i took it apart and sprayed in some of this cleaner like he mentioned where i'm pointing with a pencil, and blew it out with canned air.

the buttons are working perfect again.

real easy fix.

dave
 

Attachments

#19 ·
My new replacement speedo decided to stop working after only 3000 kms so I split it open and did the spray with CRC again. Just a small squirt into each button mechanism and everything was back to normal again. Still working 5 months on.
I think this is a permanent fix. See my previous posts in this thread.
I love you guys.. mine just sh*t the bed...3 days after warranty expired!!! (typical for me, that "clouds" been following me all my life...LOL) Will get some "CRC" and do the fix.
 
#20 ·
Ha, If I didn't have bad luck id have no luck at all! How's it going Carl?:thumb:

Donn
Hello Donn,
All is well here in the "D".
Fighting crime the "Green Hornet" way! Kaito is well, though he's a bit off his game.....He met a girl OMG!!!:D ( Oh well, even 'sidekicks' need a lil lovin').;)

Just got done dissecting my IP. sprayed the CRC spray to the button switches, just letting it dry before I go out and plug it in. hope it works but by all reports it's "THE" fix for dashboard button histrionics.
while it's apart I am gonna finally replace the plastic pin clips that hold the IP surround together with some Stainless hardware.
I trust everything is well out on the 'left' coast.
 
#21 ·
OK fellas,
I just got done testing the faulty buttons on the dash after the CRC fix.
Happy to confirm that the spray did the trick:yeahsmile::yeahsmile::yeahsmile:

Gotta love it......I feel like I can do anything I set my mind to with this bike...along with a little help from my friends:D
Love you guys:eek:penarms:

Off to the hardware for some proper screw and nuts etc so i can toss those hideous plastic thingies that hold the black dash trim together.

...to be continued:cheers:
UPDATE:
Zeph!!!! your CRC spray is a miracle!!! CLOCK BUTTONS WORKING FINE.
The bikes back together...with...new stainless hardware for the "IP" surround TOO:D
Thanks "Zeph", Thanks "Versys forum".:eek:penarms:
 
#22 ·
It looks like I'll be needing to take the gauge unit apart and do the spray fix myself. At around 7300 miles, I received a new gauge unit under warranty when my mode button got to the point that it wouldn't work at all. The shop installed it at no cost to me.

I'm about 3K on the new one now and the reset button is now acting up. I've already got one sticky on my handlebar riser with the original mileage, I don't think I want another.

Come to think about, we did have 3 & 1/2 days of rain on our 5 & 1/2 day trip in September and some of this was of the frog strangler variety.

Frog
 
#23 ·
FYI....I did it...and if you knew me...well, if I can do it anyone can...LOLOL:)
 
#24 ·
rubber button

A little armoral for lubrication around the edge of the button...then with a thin, smooth object, (thin teaspoon or similar) slip it under the lip of button, press to the center to narrow it sideways and pry up

The rubber cap has a groove in the edge that locates it in the dash panel

reverse to install

DON,T DROP IT !
 
#25 ·
Cleaner didn't work for me reset button was working maybe once in 6 tries, cleaner made it not work at all. Thought i could live without it, that lasted about a day [I use trip A for gas and trip B for lube or miles on real long trips] really like that feature wish my sportbike had two. I could live without the time but that was irritating too [it being wrong and all]

So I did a board level repair [I have a degree in electronics what the hell its only a $395 part on bikebandit lol ] works like a charm now. It is basic board you can clearly see the connection the button is closing. just solder a wire to one of each set. Drill the smallest hole you can in the center of the case with it assembled and buy a serial cable to cut up and use the really small wires out of. Also leave some strain relief in the case. You want a momentary normally open pushbutton.

sorry the pics are a bit blurry [cheap camera]